DRYな備忘録

Don't Repeat Yourself.

【iOS】画面の向き(Orientation)を特定のページのみで制限したり許可したりしたい【supportedInterfaceOrientations】

ゴール

たとえば

  • 基本的にPortrait(縦向き)のみに制限したいんだけど、特定の画面だけではLandscape(横向き)を許可したい

特定のViewで、強制的に向きを変えることはできる

けど、これは向きを変えるだけであって、ふたたび端末をぐるっとすると縦向きに戻ったりする。かなしい。

    override func viewDidLoad() {
        super.viewDidLoad()
        // Force Orientation Landscape
        UIDevice.currentDevice().setValue(UIInterfaceOrientation.LandscapeLeft.rawValue, forKey: "orientation")
    }

Info.plistで、全体的に使うOrientationは制限できる

プロジェクトファイル(file path的にはInfo.plist)で、以下のような項目があるから「これでいーじゃーん」と思ってチェックしても、これはアプリケーション全体で許可非許可の扱いなので、「◯◯というViewだけは横ね」みたいにホワイトリスト的な挙動は設定できない。
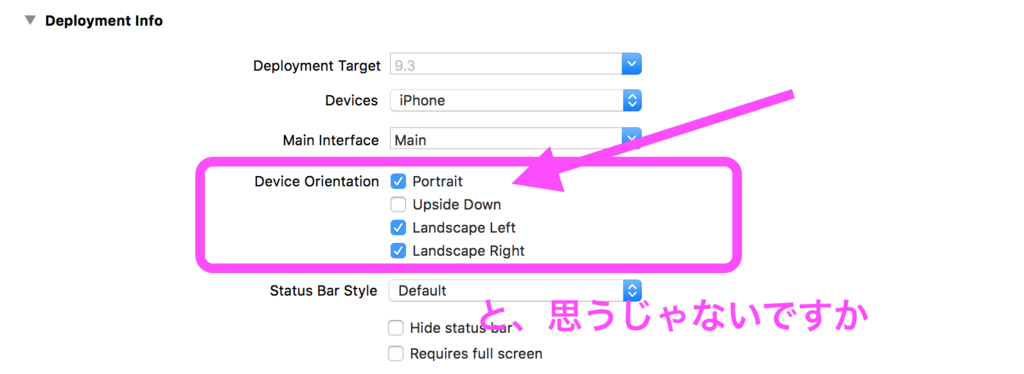
f:id:otiai10:20160919045040p:plain

supportedInterfaceOrientationsを使う

ViewControllerのメソッド(shouldAutoRotateと)supportedInterfaceOrientationを使えば、ViewControllerごとにサポートするOrientationを明示的に指定できる。

class MyViewController: UIViewController {

    // ...

    // ここでtrueを返すと、`supportedInterfaceOrientations`が呼ばれる
    override func shouldAutorotate() -> Bool {
        // まあでもデフォルトでtrue返すっぽいし、overrideしなくていいっぽい
        return true
    }

    // ここでサポートできるOrientationを明示できる
    override func supportedInterfaceOrientations() -> UIInterfaceOrientationMask {
        return UIInterfaceOrientationMask.Portrait
    }
}

supportedInterfaceOrientationsがなんかうまく動かないときに疑うこと

しかし、これだけだと(だいたいの場合)動かない(と思う)。なぜなら、

When the user changes the device orientation, the system calls this method on the root view controller or the topmost presented view controller that fills the window. supportedInterfaceOrientations #Discussion

「ユーザがデバイスの向きを変えたとき、システムはルートのViewControllerもしくは一番上で画面いっぱいに表示されているViewControllerの supportedInterfaceOrientationsを呼びます。」

とのことで、だいたいの場合、UINavigationControllerとか、TabBarControllerとか、PageViewControllerとかにこれを実装するハメになってくるんではないかと思う。

UINavigationControllerを継承したMyNavigationControllerとかを作ってもいいんですけど

一案として、上記のメソッドを実装した独自のMyNavigationControllerを作って、下記のようにするのかもしれない。

class MyNavigationController: UINavigationController {
    override func supportedInterfaceOrientations() -> UIInterfaceOrientationMask {
        return UIInterfaceOrientationMask.Portrait
    }
}
// で、Storyboardなりで、起点になるNavigationControllerの
// classをこいつに指定してあげれば、このメソッドが呼ばれるはず

たぶんこれでも動くんだけど、若干のだるさがあるので、標準のUINavigationControllerのextension作っちゃえばいいじゃないか、という結論になった。

最終的に

// TabBarControllerのcontextがメイン
extension UITabBarController {
    override public func shouldAutorotate() -> Bool {
        return true
    }
    // もうちょっとちゃんとやる場合は、子供のViewControllerに
    // supportedInterfaceOrientationsを実装して
    // return selectedVC.supportedInterfaceOrientations()
    // とかすれば、判断を子供に委譲できる
    override public func supportedInterfaceOrientations() -> UIInterfaceOrientationMask {
        guard let selectedVC = self.selectedViewController else {
            return UIInterfaceOrientationMask.Portrait
        }
        // TabBarControllerの中でNavigationを使ってるケースがある
        guard let navigation = selectedVC as? UINavigationController else {
            return UIInterfaceOrientationMask.Portrait
        }
        // Navigationで一番うえのやつを取得して
        guard let current = navigation.viewControllers.last else {
            return UIInterfaceOrientationMask.Portrait
        }
        // これ!このビューのときだけ横を許可して!!
        if current is MyCoolViewController {
            return UIInterfaceOrientationMask.Landscape
        }
        return UIInterfaceOrientationMask.Portrait
    }
}

// サービスの登録フローとかは、いきなりNavigationが出るので
extension UINavigationController {
    override public func shouldAutorotate() -> Bool {
        return true
    }
    override public func supportedInterfaceOrientations() -> UIInterfaceOrientationMask {
        return UIInterfaceOrientationMask.Portrait
    }
}

// サービスのイントロ画面は、いきなりPageViewControllerなので
extension UIPageViewController {
    override public func shouldAutorotate() -> Bool {
        return true
    }
    override public func supportedInterfaceOrientations() -> UIInterfaceOrientationMask {
        return UIInterfaceOrientationMask.Portrait
    }
}

という感じになった。これを、AppDelegate.swiftのケツにでも追加しとく。今回は明示的に "ここでだけで" まとめたかったので、各々のsupportedInterfaceOrientationを呼ぶ実装にはしなかったけど、必ず各々に判断を委譲するほうが綺麗なケースもあると思う。

雑感

  • swiftのコードをインターネッツでググっても、動いたり動かなかったりする
  • swiftという言語が若いからかなと思ったけど、どうやらそうでもない
    • 情報の絶対量はAndroidよりも多いし
    • Objective-Cの情報でも参考にできることは多いし
  • おそらくアプリの要件が人それぞれで、しかもそれがけっこう切り分けられないんだと思われる
    • 今回のケースでいうとroot view controllerがTabBarControllerだったり、NavigationControllerだったり、PageViewControllerだったりした
    • とかそういうこと
  • であるからして、慌てず焦らず、ちゃんと英語読んで、公式も当たって「なぜ動かないか」を環境非依存な知識までかみ砕いて理解していくのが大事だなあ、と思った
  • 勉強になります

DRYな備忘録として

【Go言語】ローカルのGoの(継続的な)バージョンアップ【go1.7】

なんかいつの間にこんなrepoあったの

git clone https://go.googlesource.com/go

とりあえず現状確認

% go version
go version go1.6.2 darwin/amd64
% echo $GOROOT
/Users/otiai10/.go/1.6.2
% ls /Users/otiai10/.go
1.4.3 1.5.3 1.6.2 

なるほど、かつての自分はディレクトリを分けて保存していたっぽい。ミラーじゃなくて公式にソースを配布するレポジトリになってるので、これからはgitのrevisionでソースのバージョンを管理できるはず。ということで、以下のような構成にしました。

% cd /Users/otiai10/.go
% git clone https://go.googlesource.com/go tip
% ls /Users/otiai10/.go
1.4.3 1.5.3 1.6.2 tip

いいかんじ。そして、いざインストール。これ Installing Go from source - The Go Programming Language に従って、

% cd /Users/otiai10/.go/tip
% git checkout go1.7 # "go1.7" のリリースタグのリビジョンへ移動
% cd src
% GOROOT_BOOTSTRAP=/Users/otiai10/.go/1.6.2 ./all.bash
# 1.4以降のバイナリを要求するので、そこへのpathを指定する
# 今回は、直前の1.6を使った。今後も1.6でいいだろうと思う

で、

# 中略...
+pkg debug/pe, type Section struct, Relocs []Reloc
+pkg debug/pe, type StringTable []uint8
+pkg time, func Until(Time) Duration

ALL TESTS PASSED

---
Installed Go for darwin/amd64 in /Users/otiai10/.go/tip
Installed commands in /Users/otiai10/.go/tip/bin
*** You need to add /Users/otiai10/.go/tip/bin to your PATH.

と言われるので、~/.zshrcGOROOTの値を/Users/otiai10/.go/tipに変え、PATH=$PATH:$GOROOT/bin:$GOPATH/binは変わらず。別シェルを立ててログインしなおすと、

% go version
go version go1.7 darwin/amd64

良い感じっぽい。エディタの環境設定もちょっといじる必要があるはず。まあ後でいいや。そんで、今後1.8、1.9とかがリリースされたら、

% cd /Users/otiai10/.go/tip
% git fetch origin
% git checkout {なんかそのバージョン}
% cd src
% GOROOT_BOOTSTRAP=/Users/otiai10/.go/1.6.2 ./all.bash

とすればいいはず。PATHはtipに通ってるので、もう編集する必要は無いはず。

雑感

  • ベルリンで働きはじめて半年が経ちました
  • サーバサイドエンジニアのはずが、iOS書いてます
  • ビール🍺の飲み過ぎで太りました

DRYな備忘録として

f:id:otiai10:20160904071402j:plain

SwfitでTableViewをつかってかっこいいフィードを実装するときに習得したことまとめ

いかんせんスケジュールがギリギリだったので、個別にエントリ書くのは無理でした

f:id:otiai10:20160829070135p:plain

なにもしてないのにXcodeがこわれた: An error was encountered while running (Domain = LaunchServicesError, Code = 0)

なおった

rm -rf myproject
git clone git@github.com:otiai10/myproject.git
open myproject.xcworkspace

rm -rf 最強説

【追記】XCTAssertEqualが("foo bar") is not equal to ("foo bar")などと寝ぼけたことを言う【NSNumberFormatter】

問題

("Optional("10,00 €")") is not equal to ("Optional("10,00 €")"

とか言われてXCTAssertEqualがコケる。

f:id:otiai10:20160728224408p:plain

調査

原因

NSNumberFormatter.CurrencyStyleで出力された10,00 €のbyte列

[UInt8]("10,00 €".utf8)
[49, 48, 44, 48, 48, 194, 160, 226, 130, 172]

一方、キーボードから入力した 10,00 €のbyte列

[UInt8]("10,00 €".utf8)
[49, 48, 44, 48, 48, 32, 226, 130, 172]

[49, 48, 44, 48, 48]の部分は10,00だと思われ、[226, 130, 172]も共通なのできっとだと思うので、それをPlaygroundで以下のように確認

String(bytes: [194, 160], encoding: NSUTF8StringEncoding)// " "
String(bytes: [32], encoding: NSUTF8StringEncoding)// " "
String(bytes: [226, 130, 172], encoding: NSUTF8StringEncoding)// "€"

ということで、結論としては、

  • キーボード入力のスペースは[32]
  • 一方NSNumberFormatterが吐いたスペースは[194, 160]

f:id:otiai10:20160728230229p:plain

32は分かるんだけど、194,160って何の仕様だろうか

解決

とりあえずだけど、printNSUTF8StringEncodingの出力をコピペしてテストコードに貼った。

雑感

  • でも型があるの本当に気持ちいいです
  • 8月第2週第3週は帰ります。おもにコミケのために。

追記

だいぶややこしそうだ... アプリケーションレイヤーに返す前にreplaceしといたほうがよさそうだと思った。あるいはNSNumberFormatterにそういうプロパティ無いか探してみる// TODO

DRYな備忘録として

Angular2 on TypeScriptの最小構成をつくってHello Worldするまでのみちのり

2017/04/24 追記

参考

以下原文

Angular2のquickstart、たしかにその通りにやれば動くんだけど、開発用サーバもwebpack dev serverで提供してたり、謎の依存を勝手にインストールしてたりしてて、たとえば既存のプロジェクトにAngular2を段階的導入をしたいときとか、jsだけさくっとほしいときとか、余計なものが多すぎる感があるし、必要最低限の挙動を学ぶにはブラックボックスすぎる。

ということで、Angular2とTypeScriptのjsプロジェクトをつくる最小構成を手探りでつくってみた。

HTML

ReactでいうReactDOM.renderとの対応を意識して、まず、こういうHTMLを書いた。

<html>
<head>
  <meta charset="utf-8">
</head>
<body>
<h1>てすてす</h1>
<app>
  ここを、AngularがReplaceする
</app>
<!-- このScriptが<app></app>を置換する、はず... -->
<script type="text/javascript" src="/public/js/bundle.js"></script>
</body>
</html>

bundle.jsになる前のTypeScriptを書いてみる

とりあえず、all.tsという名前で

import {bootstrap} from '@angular/platform-browser-dynamic';
import {Component} from '@angular/core';

@Component({
  selector: 'app',
  template: '<h2>Hello, {{name}}! Welcome to Angular2</h2>'
})
class App {
  name: string = 'otiai10'
}

bootstrap(App); // たぶんこれがReactDOM.renderてきなやつ

このTypeScriptをトランスパイルしつつbundle.jsにする

こういうwebpack.config.jsを書いたけど、どうせエラー出る

  1. そもそもwebpackインストールしてないから
  2. .ts解決できないから
  3. importしてる@angularとかnode_modulesにないから

そんなこと考えつつ、とりあえず

module.exports = {
  entry: {
    bundle: './client/src/all.ts'
  },
  output: {
    path: 'server/assets/js',
    filename: 'bundle.js'
  }
}

つぎに、npm initとかして適当にpackage.jsonつくってから、webpackをインストール

% npm install --save-dev webpack

で、package.jsonで、

   "scripts": {
-    "test": "echo \"Error: no test specified\" && exit 1"
+    "build": "webpack"
   },

で、とりあえずnpm run buildしてみる。エラー出るはず。

エラー: Unexpected character ‘@’. You may need an appropriate loader to handle this file type.

んーなんか直接的ではないけれど、.tsファイルをloadできてないような感じするので、

% npm install --save-dev ts-loader

で、webpack.config.js

   output: {
     path: 'server/assets/js',
     filename: 'bundle.js'
+  },
+  module: {
+    loaders: [
+      {
+        test: /\.ts$/,
+        loader: 'ts-loader'
+      }
+    ]
   }
 }

で、npm run build

エラー: Could not load TypeScript. Try installing with npm install typescript. If TypeScript is installed globally, try using npm link typescript.

オッケーオッケー

% npm install --save-dev typescript

で、npm run build

エラー: TypeError: Path must be a string. Received undefined

んんー?なんだろ。

I’ve seen some weird Node 6 reports so maybe that’s it?

マジかよw

% nvm ls
        v0.12.2
         v5.3.0
         v6.1.0
->       v6.2.0
% nvm use 5.3
Now using node v5.3.0 (npm v3.3.12)

で、rm -rf node_modules && npm install && npm run build

エラー: Cannot find module ‘@angular/platform-browser-dynamic’

やっと予想つきそうなエラーに来た。

% npm install --save-dev @angular/platform-browser-dynamic
chant@3.0.0 /Users/otiai10/proj/go/src/github.com/otiai10/chant
├── UNMET PEER DEPENDENCY @angular/common@^2.0.0-rc.4
├── UNMET PEER DEPENDENCY @angular/compiler@^2.0.0-rc.4
├── UNMET PEER DEPENDENCY @angular/core@^2.0.0-rc.4
├── UNMET PEER DEPENDENCY @angular/platform-browser@^2.0.0-rc.4
└── @angular/platform-browser-dynamic@2.0.0-rc.4

npm WARN EPEERINVALID @angular/platform-browser-dynamic@2.0.0-rc.4 requires a peer of @angular/core@^2.0.0-rc.4 but none was installed.
npm WARN EPEERINVALID @angular/platform-browser-dynamic@2.0.0-rc.4 requires a peer of @angular/common@^2.0.0-rc.4 but none was installed.
npm WARN EPEERINVALID @angular/platform-browser-dynamic@2.0.0-rc.4 requires a peer of @angular/compiler@^2.0.0-rc.4 but none was installed.
npm WARN EPEERINVALID @angular/platform-browser-dynamic@2.0.0-rc.4 requires a peer of @angular/platform-browser@^2.0.0-rc.4 but none was installed.

依存パッケージが無いっていうので、ついでに

% npm install --save-dev @angular/common@^2.0.0-rc.4 @angular/compiler@^2.0.0-rc.4 @angular/core@^2.0.0-rc.4 @angular/platform-browser@^2.0.0-rc.4
chant@3.0.0 /Users/otiai10/proj/go/src/github.com/otiai10/chant
├── @angular/common@2.0.0-rc.4
├── @angular/compiler@2.0.0-rc.4
├── @angular/core@2.0.0-rc.4
├── @angular/platform-browser@2.0.0-rc.4
├── UNMET PEER DEPENDENCY rxjs@5.0.0-beta.6
└── UNMET PEER DEPENDENCY zone.js@^0.6.6

npm WARN EPEERINVALID @angular/core@2.0.0-rc.4 requires a peer of rxjs@5.0.0-beta.6 but none was installed.
npm WARN EPEERINVALID @angular/core@2.0.0-rc.4 requires a peer of zone.js@^0.6.6 but none was installed.

またしても依存パッケージが無いと言われるので、ついでに

% npm install --save-dev rxjs@5.0.0-beta.6 zone.js@^0.6.6
chant@3.0.0 /Users/otiai10/proj/go/src/github.com/otiai10/chant
├── rxjs@5.0.0-beta.6
└── zone.js@0.6.12

お、全部入った? で、とりあえず npm run build

エラー: Cannot find name ‘Map’. Cannot find name ‘Promise’. Cannot find name ‘Set’.

なんか標準のES6のdefinitionを見つけられてない気がするぞ。

% npm install --save-dev typings
% ./node_modules/.bin/typings install dt~es6-shim --save --global
% cat typings.json

で、npm run build

エラー: Experimental support for decorators is a feature that is subject to change in a future release. Set the ‘experimentalDecorators’ option to remove this warning.

ああそうですか、的な感じで、tscのエラーなので、tsconfigに以下を追加

 1 file changed, 1 insertion(+)

diff --git a/tsconfig.json b/tsconfig.json
index e30c6ef..6cece18 100644
--- a/tsconfig.json
+++ b/tsconfig.json
@@ -1,5 +1,6 @@
 {
   "compilerOptions": {
+    "experimentalDecorators": true,
     "target": "es5"
   },
   "files": [

で、npm run build

f:id:otiai10:20160725005212p:plain

エラー無しだ!!やったー!!

エラー: bundle.js:4658Uncaught reflect-metadata shim is required when using class decorators

で、ブラウザで確認

f:id:otiai10:20160725005432p:plain

なるほど?

% npm install --save-dev zone.js reflect-metadata

エラー: Exported external package typings file ‘**/node_modules/zone.js/dist/zone.js.d.ts’ is not a module. Please contact the package author to update the package definition.

まじかよ

% rm ./node_modules/zone.js/dist/zone.js.d.ts
% ./node_modules/.bin/typings install zone.js --save --global

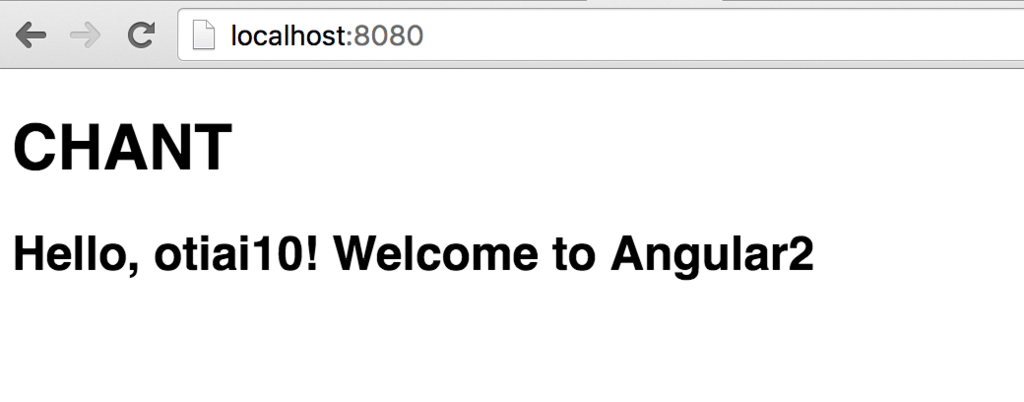
Hello, Angular2 on TypeScript!!

やっと動いた。

f:id:otiai10:20160725011542p:plain

雑感

  • Angular2 on TypeScript界隈の、エコシステムWIP感やばすぎるでしょ
  • 安定したころに「じゃあstable版に上げましょうか」みたいなタスク発生するのつらいので、さすがに仕事では使いたくない
  • Angular1 on TypeScriptとかでじゅうぶんなのでは?もちろんプロジェクトの規模によるけど
  • 個人開発でやろうとしたのはReact(非reduct)-> Angular2 x TypeScriptなんだけど、わりと心折れそうです

DRYな備忘録として

f:id:otiai10:20160716213843j:plain

f:id:otiai10:20160716214711j:plain

Thanks to U+Driving your business ideas to digital reality | Usertech

AlamofireとSwiftyJSONとSwiftTaskで、genericなprotocolを受ける汎用的なHTTPClientをつくりたい

問題

  • AlamofireとSwiftTaskで汎用的にレスポンスをモデルにデコードするようなHTTP Clientをつくりたい
  • 特定のAPIエンドポイントのレスポンスをデコードするロジックは、各モデルにもたせたい

SwiftJSONを受けて"何らかの"モデルにデコードするメソッドを持つProtocolを作る

import SwiftyJSON

protocol JSONMappable{
    associatedtype T
    static func mapJSON(json: SwiftyJSON.JSON) -> T
}

associatedtypegenericsとして受け取れるprotocolなので、このprotocolをimplementするclassにおいてtypealiasTを指定すれば、その型を返すメソッドの実装でこのprotocolを満たせる。

このProtocolを満たすClassを作る

Model的なもの

import SwiftyJSON

class User: NSObject, JSONMappable {
    let name: String
    let age: Int

    init(name: String, age: Int) {
        self.name = name
        self.age = age
        super.init()
    }

    // MARK: - JSONMappableの実装
    typealias T = User // mapJSONの返り値としてUserを実装
    static func mapJSON(json: JSON) -> T {
        return User(
            json["name"].stringValue,
            json["age"].intValue
        )
    }
}

genericなprotocolを返り値に取れるHTTPClientを作る

import Alamofire
import SwiftTask
import SwiftyJSON

class HTTPClient: NSObject {
    static func request<T:JSONMappable>(
        method: Alamofire.Method,
        url: NSURL,
        params: [String: AnyObject]?,
        headers: [String:String] = ["Content-Type": "application/json"]
    ) -> Task<(Int64, Int64, Int64), T, NSError> {
        return Task<(Int64, Int64, Int64), T, NSError> { progress, fulfill, reject, configure in
            Alamofire.request(method, url, parameters: params, headers: headers, encoding: .JSON)
                .responseJSON { response -> Void in
                    switch response.result {
                    case .Success(let value):
                        let json = JSON(rawValue: value)
                        // TはJSONMappableなので、mapJSONメソッドを持っている
                        if mapped = T.mapJSON(json!) as? T {
                            fulfill(mapped)
                        } else {
                            reject(NSError(domain: "foo", code: 123, userInfo: nil))
                        }
                        return
                    case .Failure(let error):
                        reject(error)
                        return
                    }
                }
        }
    }
}

番外: APIエンドポイントとモデルを紐付けるクラスをつくる

本論では無いけど、HTTPClientを継承してエンドポイントとモデルの関連を固定するクラスをつくってみる

class UserAPI: HTTPClient {
    static func get(id: Int) -> Task<(Int64, Int64, Int64), User, NSError> {
        let url = NSURL(string: "http://localhost:8080/user/\(id)")!
        return request(.GET, url: url, params: [:])
    }
}

ゴール: ViewControllerから使う

UserAPI.get(1)
    .success { user -> Void in
        print("user取れた", user)
    }
    .failure { error, cancelled -> Void in
        print("失敗した", error)
    }

雑感

  • 最近JSばっかりだったので、型とエディタが強力なのすごい気持ちいい

f:id:otiai10:20160717214141p:plain

DRYな備忘録