DRYな備忘録

Don't Repeat Yourself.

【Go言語】準標準のWebSocketパッケージを使ったミニマムなチャットのサンプル

をつくって、こういう知見がたまったよ、みたいなの書こうと思ったんですが、Goの準標準パッケージである golang.org/x/net/websocket が便利すぎて「あ...できたわ」以上の感想が無いっていう現象になりました。

成果物はこちらです。ご査収ください。HTML入れても160行ぐらいしかないです。

github.com

f:id:otiai10:20171109005002p:plain

というかGoのチュートリアルでチャットってよく使われるからGoエンジニア飽きもせず何度もチャットつくるマンみたいになってる気がする。

DRYな備忘録として

みんなのGo言語【現場で使える実践テクニック】

みんなのGo言語【現場で使える実践テクニック】

【追記あり】【解決】Mac上のVagrantでFreeBSDが動かない

2017/11/28 追記

このVagrantfileですべてが動くことを確認できたので【解決】としました。

github.com

2017/11/16 追記

どうやらFreeBSDにおけるsudoの実装が内包しているバグだった模様で、公式が「数日内にバグフィックス出すよ」と言っている。とりあえず全裸待機。


以下原文


目的

環境

% vagrant --version
Vagrant 2.0.0
% VBoxManage --version
5.1.30r118389
% system_profiler SPSoftwareDataType | grep Version
      System Version: macOS 10.12.6 (16G29)
      Kernel Version: Darwin 16.7.0
%

公式ドキュメントに書かれたやりかた

Vagrant CloudにあるFreeBSDのbox

% mkdir -p ~/tmp/vagrant-freebsd-test
% cd ~/tmp/vagrant-freebsd-test
% vagrant init freebsd/FreeBSD-10.4-STABLE
A `Vagrantfile` has been placed in this directory. You are now
ready to `vagrant up` your first virtual environment! Please read
the comments in the Vagrantfile as well as documentation on
`vagrantup.com` for more information on using Vagrant.
% ls
Vagrantfile

で、

% vagrant up
Bringing machine 'default' up with 'virtualbox' provider...
==> default: Importing base box 'freebsd/FreeBSD-10.4-STABLE'...
No base MAC address was specified. This is required for the NAT networking
to work properly (and hence port forwarding, SSH, etc.). Specifying this
MAC address is typically up to the box and box maintainer. Please contact
the relevant person to solve this issue.

ふぇぇ

No base MAC address was specified.

FreeBSD側で書いてあったVagrantfile

base_macもコピペなので動かねえんじゃねえの?という予想がありつつ、

Vagrant.configure("2") do |config|
  config.vm.guest = :freebsd
  config.vm.synced_folder ".", "/vagrant", id: "vagrant-root", disabled: true
  config.vm.box = "freebsd/FreeBSD-10.4-STABLE"
  config.ssh.shell = "sh"
  config.vm.base_mac = "080027D14C66"

  config.vm.provider :virtualbox do |vb|
    vb.customize ["modifyvm", :id, "--memory", "1024"]
    vb.customize ["modifyvm", :id, "--cpus", "1"]
    vb.customize ["modifyvm", :id, "--hwvirtex", "on"]
    vb.customize ["modifyvm", :id, "--audio", "none"]
    vb.customize ["modifyvm", :id, "--nictype1", "virtio"]
    vb.customize ["modifyvm", :id, "--nictype2", "virtio"]
  end
end
% vagrant up
Bringing machine 'default' up with 'virtualbox' provider...
==> default: Importing base box 'freebsd/FreeBSD-10.4-STABLE'...
==> default: Matching MAC address for NAT networking...
==> default: Checking if box 'freebsd/FreeBSD-10.4-STABLE' is up to date...
==> default: Setting the name of the VM: vagrant-freebsd-test_default_1509123869695_7924
==> default: Clearing any previously set network interfaces...
==> default: Preparing network interfaces based on configuration...
    default: Adapter 1: nat
==> default: Forwarding ports...
    default: 22 (guest) => 2222 (host) (adapter 1)
==> default: Running 'pre-boot' VM customizations...
==> default: Booting VM...
==> default: Waiting for machine to boot. This may take a few minutes...
    default: SSH address: 127.0.0.1:2222
    default: SSH username: vagrant
    default: SSH auth method: private key
    default: Warning: Remote connection disconnect. Retrying...
    default: Warning: Connection reset. Retrying...
    default: Warning: Remote connection disconnect. Retrying...
    default: Warning: Connection reset. Retrying...
#
# これのクッソ繰り返し
#
    default: Warning: Remote connection disconnect. Retrying...
    default: Warning: Connection reset. Retrying...
    default: Warning: Remote connection disconnect. Retrying...
    default: Warning: Connection reset. Retrying...
    default: Warning: Remote connection disconnect. Retrying...
    default:
    default: Vagrant insecure key detected. Vagrant will automatically replace
    default: this with a newly generated keypair for better security.
    default:
    default: Inserting generated public key within guest...
    default: Removing insecure key from the guest if it is present...
    default: Key inserted! Disconnecting and reconnecting using new SSH key...
==> default: Machine booted and ready!
==> default: Checking for guest additions in VM...
    default: The guest additions on this VM do not match the installed version of
    default: VirtualBox! In most cases this is fine, but in rare cases it can
    default: prevent things such as shared folders from working properly. If you see
    default: shared folder errors, please make sure the guest additions within the
    default: virtual machine match the version of VirtualBox you have installed on
    default: your host and reload your VM.
    default:
    default: Guest Additions Version: 5.2.0
    default: VirtualBox Version: 5.1

なんかSSH Connectionのリトライめっちゃしているように見えるが、Machine booted and ready!と自信満々に言われたので、とりあえずsshを試す。

% vagrant ssh
FreeBSD 10.4-STABLE (GENERIC) #0 r324749: Thu Oct 19 15:55:47 UTC 2017

Welcome to FreeBSD!

Release Notes, Errata: https://www.FreeBSD.org/releases/
Security Advisories:   https://www.FreeBSD.org/security/
FreeBSD Handbook:      https://www.FreeBSD.org/handbook/
FreeBSD FAQ:           https://www.FreeBSD.org/faq/
Questions List: https://lists.FreeBSD.org/mailman/listinfo/freebsd-questions/
FreeBSD Forums:        https://forums.FreeBSD.org/

Documents installed with the system are in the /usr/local/share/doc/freebsd/
directory, or can be installed later with:  pkg install en-freebsd-doc
For other languages, replace "en" with a language code like de or fr.

Show the version of FreeBSD installed:  freebsd-version ; uname -a
Please include that output and any error messages when posting questions.
Introduction to manual pages:  man man
FreeBSD directory layout:      man hier

Edit /etc/motd to change this login announcement.
"man firewall" will give advice for building a FreeBSD firewall
        -- David Scheidt <dscheidt@tumbolia.com>
vagrant@:~ % uname -a
FreeBSD  10.4-STABLE FreeBSD 10.4-STABLE #0 r324749: Thu Oct 19 15:55:47 UTC 2017     root@releng1.nyi.freebsd.org:/usr/obj/usr/src/sys/GENERIC  amd64
vagrant@:~ %
vagrant@:~ % echo "Hello, FreeBSD!"
Hello, FreeBSD!
vagrant@:~ %

まあsshはできてる。

再現性を確認するために、お掃除しとく。

% vagrant destroy
    default: Are you sure you want to destroy the 'default' VM? [y/N] y
==> default: Forcing shutdown of VM...
==> default: Destroying VM and associated drives...
% ls
Vagrantfile
%

Provisionを試みる: Segmentation fault

Vagrantfile編集

Vagrant.configure("2") do |config|
  config.vm.guest = :freebsd
  config.vm.synced_folder ".", "/vagrant", id: "vagrant-root", disabled: true
  config.vm.box = "freebsd/FreeBSD-10.4-STABLE"
  config.ssh.shell = "sh"
  config.vm.base_mac = "080027D14C66"

  config.vm.provider :virtualbox do |vb|
    vb.customize ["modifyvm", :id, "--memory", "1024"]
    vb.customize ["modifyvm", :id, "--cpus", "1"]
    vb.customize ["modifyvm", :id, "--hwvirtex", "on"]
    vb.customize ["modifyvm", :id, "--audio", "none"]
    vb.customize ["modifyvm", :id, "--nictype1", "virtio"]
    vb.customize ["modifyvm", :id, "--nictype2", "virtio"]
  end
+
+  config.vm.provision "shell", inline: "echo hello"
+
end

で、

% vagrant up
# 中略
==> default: Running provisioner: shell...
    default: Running: inline script
The SSH command responded with a non-zero exit status. Vagrant
assumes that this means the command failed. The output for this command
should be in the log above. Please read the output to determine what
went wrong.
%

Vagrant assumes that this means the command failed.

って、echoが失敗してるとでも言うのかお前は。ためしに、

% vagrant ssh --command "echo hgoeeee"
hgoeeee
Connection to 127.0.0.1 closed.
%

Vagrantのログは、providerがVirtualBoxの場合(VirtualBoxのインストールディレクトリにもよるとは思うけれど)、
~/VirtualBox VMs/vagrant-freebsd-test_default_1509154848753_31244/Logs
にあるっぽい。

他には、

% vagrant destroy -f && vagrant up --debug

で得られるものもある。で、それっぽいエラー箇所抜粋↓

DEBUG virtualbox_5_1:   - [1, "ssh", 2222, 22, "127.0.0.1"]
DEBUG ssh: Checking key permissions: /Users/otiai10/tmp/vagrant-freebsd-test/.vagrant/machines/default/virtualbox/private_key
DEBUG ssh: Re-using SSH connection.
 INFO ssh: Execute: chown -R vagrant /tmp/vagrant-shell (sudo=true)
DEBUG ssh: stderr: Segmentation fault

DEBUG ssh: Exit status: 139
DEBUG ssh: Uploading: /var/folders/__/xxcbtw6j0tb681fjv1lbnlg40000gn/T/vagrant-shell20171028-68133-1nvns04.ps1 to /tmp/vagrant-shell
DEBUG ssh: Re-using SSH connection.
 INFO interface: detail: Running: inline script
 INFO interface: detail:     default: Running: inline script
    default: Running: inline script
DEBUG ssh: Re-using SSH connection.
 INFO ssh: Execute: chmod +x '/tmp/vagrant-shell' && /tmp/vagrant-shell (sudo=true)
DEBUG ssh: stderr: Segmentation fault

DEBUG ssh: Exit status: 139

Segmentation fault

ふむ。

sudoerではないprovisionの実行は成功

ためしに、sudo=falseとしてみる。Vagrantfileで、

     vb.customize ["modifyvm", :id, "--nictype2", "virtio"]
   end

-  config.vm.provision "shell", inline: "echo hello"
+  config.vm.provision "shell", inline: "echo hello", privileged: false
 end

そんでふたたび、

% vagrant destroy -f && vagrant up --debug

とすると、

f:id:otiai10:20171028105826p:plain

ProvisionにおけるユーザのPrivilegeの問題であることが切り分けられた。

provisionにおけるユーザのsudoについて

前述の

をちゃんと読む

Seems like sudo will segfault on official FreeBSD STABLE (but not RELEASE) Vagrant boxes if a hostname isn't set. Problem is Vagrant uses sudo to set any hostname specified in the Vagrantfile or run any shell commands.

Setting it manually worked for me:

% vagrant ssh
vagrant@:~ % su
root@:/home/vagrant # sysrc hostname=myhost.local (modifies rc.conf)
root@:/home/vagrant # halt -p
% vagrant up --provision

f:id:otiai10:20171028111520p:plain

うーん、動いたけど、vagrant sshしてる時点でプロビジョニングツールとしてどうなんだという感じ。

Seems like sudo will segfault on official FreeBSD STABLE (but not RELEASE) Vagrant boxes if a hostname isn't set.

ほんまかいな。-RELEASE使ったろ。

Vagrant.configure("2") do |config|
  config.vm.guest = :freebsd
  config.vm.synced_folder ".", "/vagrant", id: "vagrant-root", disabled: true
-  config.vm.box = "freebsd/FreeBSD-10.4-STABLE"
+  config.vm.box = "freebsd/FreeBSD-10.4-RELEASE"
  config.ssh.shell = "sh"
  config.vm.base_mac = "080027D14C66"

で、

% vagrant destroy -f && vagrant up
DEBUG virtualbox_5_1:   - [1, "ssh", 2222, 22, "127.0.0.1"]
DEBUG ssh: Checking key permissions: /Users/otiai10/tmp/vagrant-freebsd-test/.vagrant/machines/default/virtualbox/private_key
DEBUG ssh: Re-using SSH connection.
 INFO ssh: Execute: chown -R vagrant /tmp/vagrant-shell (sudo=true)
DEBUG ssh: stderr: Segmentation fault

DEBUG ssh: Exit status: 139
DEBUG ssh: Uploading: /var/folders/__/xxcbtw6j0tb681fjv1lbnlg40000gn/T/vagrant-shell20171028-72476-1wwln9a.ps1 to /tmp/vagrant-shell
DEBUG ssh: Re-using SSH connection.
 INFO interface: detail: Running: inline script
 INFO interface: detail:     default: Running: inline script
    default: Running: inline script
DEBUG ssh: Re-using SSH connection.
 INFO ssh: Execute: chmod +x '/tmp/vagrant-shell' && /tmp/vagrant-shell (sudo=true)
DEBUG ssh: stderr: Segmentation fault

ふつうにSegmentation fault出るやん。一応検証のため、

% vagrant ssh
vagrant@:~ % su
root@:/home/vagrant # sysrc hostname=testtest.local
root@:/home/vagrant # halt -p
Connection to 127.0.0.1 closed by remote host.
Connection to 127.0.0.1 closed.
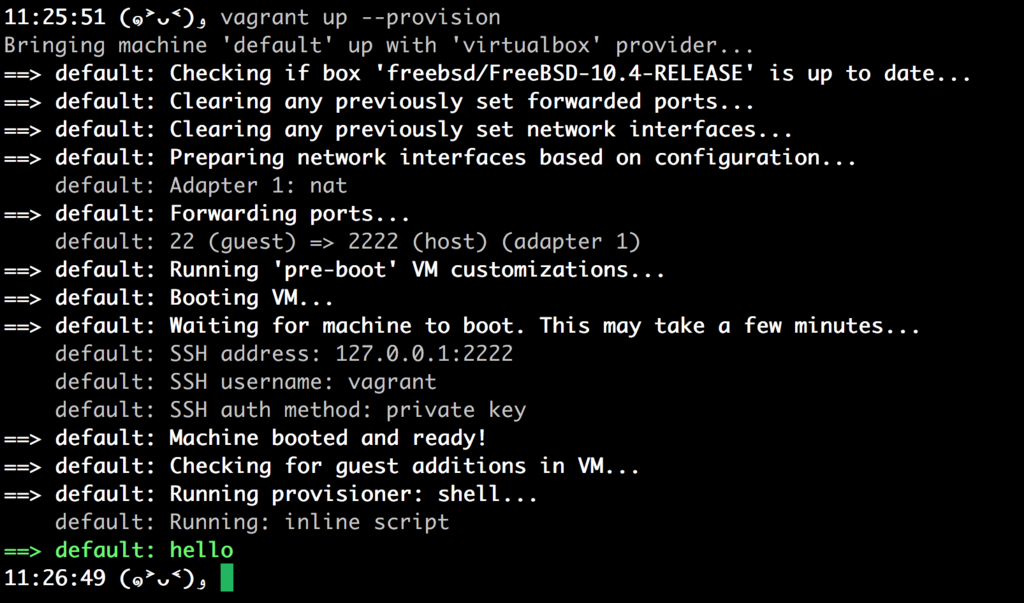
% vagrant up --provision
f:id:otiai10:20171028112741p:plain

んなぁ〜動くなぁ〜。

Vagrantfileによるhostnameの指定は可能か?

config.vm.hostname - The hostname the machine should have. Defaults to nil. If nil, Vagrant will not manage the hostname. If set to a string, the hostname will be set on boot.

いけるっぽいぞ。ためしに、Vagrantfileを、

Vagrant.configure("2") do |config|
  config.vm.guest = :freebsd
  config.vm.synced_folder ".", "/vagrant", id: "vagrant-root", disabled: true
  config.vm.box = "freebsd/FreeBSD-10.4-RELEASE"
  config.ssh.shell = "sh"
  config.vm.base_mac = "080027D14C66"
+
+  config.vm.hostname = "testtest.local"
+

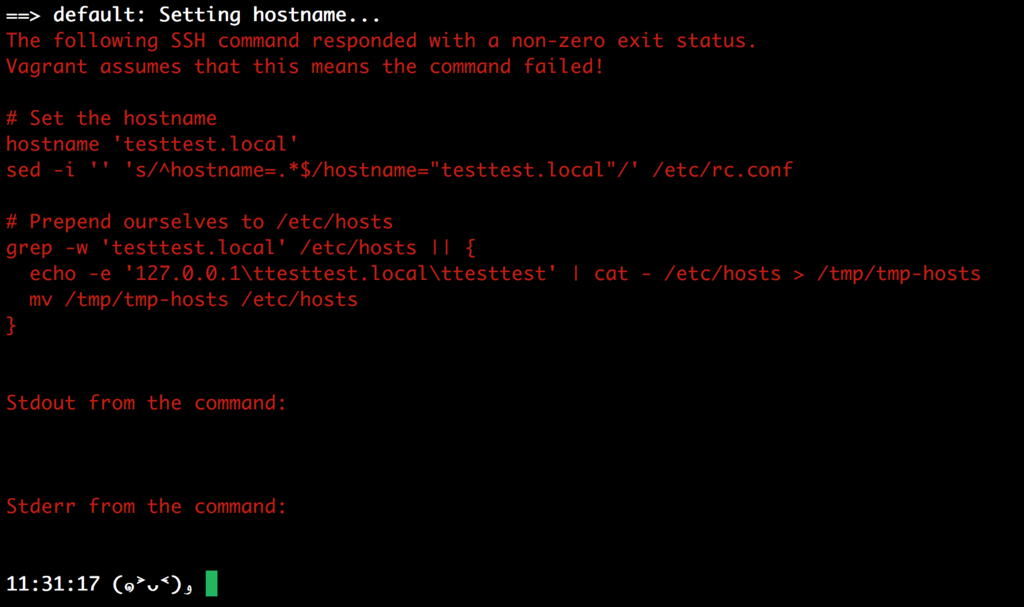
としてみるものの、
f:id:otiai10:20171028113445p:plain

hostnameを実行しようとするとき、同様にSegmentation faultが出ている。

ここまでの結論

  • sudoしようとするときにSegmentation faultになる
  • sshしてhostnameを設定すると解決する
  • 再現可能

Next Action

ElectronアプリをMac上でWindows向けにビルドする

ゴール

  • MacOS上で動いてるElectronアプリがある
  • electron-packagerを使い、Mac用に.appというフォルダを作って配布できている
  • Windowsのひとたちにも配布したい

参考

手順

  1. electron-packagerを使って、ビルドディレクトリをつくる
  2. electron-winstaller を使って、インストーラ .exe をつくる

Windows用のビルドディレクトリをつくる

Building Windows apps from non-Windows platforms に従って、

% electron-packager . MyApp \
  --platform=win64 \
  --arch=x64 \
  --version=0.0.1 \
  --out=builds/windows \
  --icon=assets/myapp.icns --overwrite

エラー: Unsupported platform=win64 (string); must be a string matching: darwin, linux, mas, win32

Supported Platforms に、

Windows (also known as win32, for both 32/64 bit)

とある。ので、

% electron-packager . MyApp \
-  --platform=win64 \
+  --platform=win32 \
  --arch=x64 \
  --version=0.0.1 \
  --out=builds/windows \
  --icon=assets/myapp.icns --overwrite

エラー: Could not find "wine" on your system.

Packaging app for platform win32 x64 using electron v1.7.5
Could not find "wine" on your system.

Wine is required to use the appCopyright, appVersion, buildVersion, icon, and
win32metadata parameters for Windows targets.

Make sure that the "wine" executable is in your PATH.

Building Windows apps from non-Windows platforms をよく読むと、

so on non-Windows host platforms, Wine 1.6 or later needs to be installed. On OS X, it is installable via Homebrew.

とあるので、

% brew search wine
% brew install wine
wine: XQuartz is required to install this formula.X11Requirement unsatisfied!

You can install with Homebrew-Cask:
  brew cask install xquartz

You can download from:
  https://xquartz.macosforge.org
Error: An unsatisfied requirement failed this build.
# ほう?
% brew cask install xquartz
% brew install wine
==> Summary
🍺  /usr/local/Cellar/wine/2.0.3: 8,252 files, 591.9MB
# 入った
% which wine
/usr/local/bin/wine
# PATHも通ってる

electron-packagerによるビルドの成功

% electron-packager . MyApp \
  --platform=win64 \
  --arch=x64 \
  --version=0.0.1 \
  --out=builds/windows \
  --icon=assets/myapp.icns --overwrite

Packaging app for platform win32 x64 using electron v1.7.5
Wrote new app to builds/windows/MyApp-win32-x64

いい感じ。

インストーラの作成

% mkdir scripts
% vi scripts/windows-build-installer.js
/* eslint no-console:0 */
var winstaller = require('electron-winstaller');

winstaller.createWindowsInstaller({
  appDirectory: './builds/windows/MyApp-win32-x64/',
  outputDirectory: '/tmp/build/installer64',
  authors: 'My App Inc.',
  exe: 'myapp.exe'
})
  .then(() => console.log('It worked!'))
  .catch(e => console.log(`No dice: ${e.message}`));

エラー: No dice: spawn mono ENOENT

% node ./scripts/windows-build-installer.js
No dice: spawn mono ENOENT

ふむ。

ほう?

% brew search mono
% brew info mono
% brew install mono
% wich mono
/usr/local/bin/mono

インストーラ作成成功

ふたたび

% node ./scripts/windows-build-installer.js
It worked!
% ls -la /tmp/build/installer64
RELEASES        MyApp-0.0.1-full.nupkg  Setup.exe

いけてるっぽいぞ。

この.exeWindowsで実行したら、無事デスクトップアプリがWindowsで起動した!

DRYな備忘録として

Terraformってなんぞや

目的

  • Terraformのなんたるかを知る
  • Terraformの初歩的な使い方を知る
  • Terraformを使ってみる

調査

サンプルを眺める

より。HCL(HashiCorp Configuration Language) という文法で記述される。

resource "aws_elb" "frontend" {
  name = "frontend-load-balancer"
  listener {
    instance_port     = 8000
    instance_protocol = "http"
    lb_port           = 80
    lb_protocol       = "http"
  }
 
  instances = ["${aws_instance.app.*.id}"]
}
 
resource "aws_instance" "app" {
  count = 5

  ami           = "ami-408c7f28"
  instance_type = "t1.micro"
}

# aws_elb.frontendという名前のELBを建てて、80番ポートで受けて、
# その参照先が aws_instance.appという名前に帰属する
# 5つのインスタンスの8000番に向いているんだろうな、
# という雰囲気がなんとなくわかる。
# だけどこれ、VPCとかSecurityGroupとかどうなってるんだ?
# An AMI
variable "ami" {
  description = "the AMI to use"
}

/* A multi
   line comment. */
resource "aws_instance" "web" {
  ami               = "${var.ami}"
  count             = 2
  source_dest_check = false

  connection {
    user = "root"
  }
}

terraformのインストール

% brew search terraform
% brew info terraform
% brew install terraform
# 中略...
/usr/local/Homebrew/Library/Homebrew/brew.rb:12:in `<main>': Homebrew must be run under Ruby 2.3! (RuntimeError)

だっる。

% ruby --version
ruby 2.0.0p648 (2015-12-16 revision 53162) [universal.x86_64-darwin16]

クソ古いやん。

% rbenv versions
* system (set by /Users/otiai10/.rbenv/version)
% rbenv install --list | grep 2.3
% rbenv install 2.3.5
% rbenv global 2.3.5
% rbenv rehash
% ruby --version
ruby 2.3.5p376 (2017-09-14 revision 59905) [x86_64-darwin16]
% brew install terraform
% terraform --version
Terraform v0.10.7

はい。

Hello, Terraform!

% mkdir -p ~/tmp/terraform/hello
% cd ~/tmp/terraform/hello
% vi hello.tf
# プロバイダの設定。
# AWSを使うこと、API keys、リージョンなどを指定する。
provider "aws" {
    #  > Terraform will automatically search for saved API credentials (for example, in ~/.aws/credentials)
    # とのことなので、AWS Keysは割愛します
    /*
    access_key = "ACCESS_KEY"
    secret_key = "SECRET_KEY"
    */

    # ワケあってシドニー
    region = "ap-southeast-2"
}

# 具体的な構成の設定。
resource "aws_instance" "hello-terraform" {
    ami = "ami-2757f631"
    instance_type = "t2.micro"
}

この状況でplanしてみると、

Plugin reinitialization required. Please run "terraform init".
Reason: Could not satisfy plugin requirements.

Plugins are external binaries that Terraform uses to access and manipulate
resources. The configuration provided requires plugins which can't be located,
don't satisfy the version constraints, or are otherwise incompatible.

1 error(s) occurred:
# プロバイダの設定。

* provider.aws: no suitable version installed
  version requirements: "(any version)"
  versions installed: none

Terraform automatically discovers provider requirements from your
configuration, including providers used in child modules. To see the
requirements and constraints from each module, run "terraform providers".

error satisfying plugin requirements

まずinitしろと叱られる。

% terraform init

Initializing provider plugins...
- Checking for available provider plugins on https://releases.hashicorp.com...
- Downloading plugin for provider "aws" (1.1.0)...

The following providers do not have any version constraints in configuration,
so the latest version was installed.

To prevent automatic upgrades to new major versions that may contain breaking
changes, it is recommended to add version = "..." constraints to the
corresponding provider blocks in configuration, with the constraint strings
suggested below.

* provider.aws: version = "~> 1.1"

Terraform has been successfully initialized!

You may now begin working with Terraform. Try running "terraform plan" to see
any changes that are required for your infrastructure. All Terraform commands
should now work.

If you ever set or change modules or backend configuration for Terraform,
rerun this command to reinitialize your working directory. If you forget, other
commands will detect it and remind you to do so if necessary.

aws pluginがインストールされた模様。あらためてplanする

% terraform plan
Refreshing Terraform state in-memory prior to plan...
The refreshed state will be used to calculate this plan, but will not be
persisted to local or remote state storage.


------------------------------------------------------------------------

An execution plan has been generated and is shown below.
Resource actions are indicated with the following symbols:
  + create

Terraform will perform the following actions:

  + aws_instance.hello-terraform
      id:                           <computed>
      ami:                          "ami-2757f631"
      associate_public_ip_address:  <computed>
      availability_zone:            <computed>
      ebs_block_device.#:           <computed>
      ephemeral_block_device.#:     <computed>
      instance_state:               <computed>
      instance_type:                "t2.micro"
      ipv6_address_count:           <computed>
      ipv6_addresses.#:             <computed>
      key_name:                     <computed>
      network_interface.#:          <computed>
      network_interface_id:         <computed>
      placement_group:              <computed>
      primary_network_interface_id: <computed>
      private_dns:                  <computed>
      private_ip:                   <computed>
      public_dns:                   <computed>
      public_ip:                    <computed>
      root_block_device.#:          <computed>
      security_groups.#:            <computed>
      source_dest_check:            "true"
      subnet_id:                    <computed>
      tenancy:                      <computed>
      volume_tags.%:                <computed>
      vpc_security_group_ids.#:     <computed>


Plan: 1 to add, 0 to change, 0 to destroy.

------------------------------------------------------------------------

Note: You didn't specify an "-out" parameter to save this plan, so Terraform
can't guarantee that exactly these actions will be performed if
"terraform apply" is subsequently run.

当たり前だけど、もっと色々指定可能であることが分かる。前述の疑問(「だけどこれ、VPCとかSecurityGroupとかどうなってるんだ?」)は、vpc_security_group_idsあたりだろうか。いよいよ、applyしてローンチしてみる。

% terraform apply
# 中略
Error applying plan:

1 error(s) occurred:

* aws_instance.hello-terraform: 1 error(s) occurred:

* aws_instance.hello-terraform: Error launching source instance: InvalidAMIID.NotFound: The image id '[ami-2757f631]' does not exist
    status code: 400, request id: 00d6f091-b677-47ca-bc17-f8671eb07501

適当にドキュメントに書かれたAMI IDを使っていたので「AMIが存在しない」と叱られる。region変えたからかな。ちゃんと書いてやる。シドニーでいちばん簡単なAmazon Linuxってこれami-66fbe605でいいんだろうか。

resource "aws_instance" "hello-terraform" {
-    ami = "ami-2757f631"
+    ami = "ami-66fbe605"
    instance_type = "t2.micro"
}

あらためて。

% terraform apply
# 中略...
Apply complete! Resources:1 added, 0 changed, 0 destroyed.

f:id:otiai10:20171017143708p:plain

いいですね。

% terraform show

で色々確認できる。気づいたこと、

  • VPCを指定しなかったので、default VPCになってる
  • SecurityGroupも、defaultのものを使っている
    • 新規作成したい場合は、おそらくsgも.tfに書いて参照させればよいのだろう
    • VPC.tfでつくれるのかな?
  • key pairを指定しなかったので、おそらくsshはできない気がする
  • public IPも消せるのだろう
    • associate_public_ip_address = true これだ
  • Build Infrastructure - Terraform by HashiCorp
    • インスタンスつくった後のプロビジョニング(前述で「サーバ設定」と呼称したもの)もできるっぽい
    • その場合、key pairは自動でつくられるのかな?
  • このhello.tfによって定義されインスタンス化されクラスタへの参照は、terraform.tfstate, terraform.tfstate.backup に保存されているっぽい

クラスタインスタンスの変更・編集

The prefix "-/+" means that Terraform will destroy and recreate the resource, versus purely updating it in-place. While some attributes can do in-place updates (which are shown with a "~" prefix), AMI changing on EC2 instance requires a new resource. Terraform handles these details for you, and the execution plan makes it clear what Terraform will do.

resource "aws_instance" "hello-terraform" {
-    ami = "ami-66fbe605"
-    instance_type = "t2.micro"
+    ami = "ami-5bc2f938"
+    instance_type = "t2.nano"
}

AMIの変更・インスタンスタイプの変更は、インスタンスの作り直しが発生するので、かならず-/+となるはず。

% terraform plan
# 中略...
-/+ aws_instance.hello-terraform (new resource required)
      id:     "i-0f4c9ccc6ad36fb74" => <computed> (forces new resource)
      ami:    "ami-66fbe605" => "ami-5bc2f938" (forces new resource)
# 中略...

% terraform apply

クラスタインスタンスの削除

% terraform plan -destroy
% terraform destroy
# 中略
Destroy complete! Resources: 1 destroyed.

その他

DevOpsを支えるHashiCorpツール大全 ThinkIT Books

DevOpsを支えるHashiCorpツール大全 ThinkIT Books

雑感

  • 結局DSLを覚えるコストがあるけれど、覚えてしまえば便利そう
  • CloudFormationをポチポチやるよりはよっぽどよさそう
  • また肉離れした。全力で動いても壊れない身体が欲しい...

DRYな備忘録として

Tesseract-OCRをソースからコンパイルする(4.00.00dev)

背景

Tesseract-OCR 4.00.00devで動かない、というissueが来た。

github.com

前回記事

Tesseract-OCRのDockerコンテナ内でのビルド

otiai10.hatenablog.com

今回の成果物

FROM debian:stretch

ARG TESS="4.00.00dev"
ARG LEPTO="1.74.2"

# Prepare dependencies
RUN apt-get update
RUN apt-get install -y \
  wget \
  make \
  autoconf \
  automake \
  libtool \
  autoconf-archive \
  pkg-config \
  libpng-dev \
  libjpeg-dev \
  libtiff-dev \
  zlib1g-dev \
  libicu-dev \
  libpango1.0-dev \
  libcairo2-dev

ENV LD_LIBRARY_PATH=${LD_LIBRARY_PATH}:/usr/local/lib

# Compile Leptonica
WORKDIR /
RUN mkdir -p /tmp/leptonica \
  && wget https://github.com/DanBloomberg/leptonica/archive/${LEPTO}.tar.gz \
  && tar -xzvf ${LEPTO}.tar.gz -C /tmp/leptonica \
  && mv /tmp/leptonica/* /leptonica
WORKDIR /leptonica

RUN autoreconf -i \
  && ./autobuild \
  && ./configure \
  && make \
  && make install

# Compile Tesseract
WORKDIR /
RUN mkdir -p /tmp/tesseract \
  && wget https://github.com/tesseract-ocr/tesseract/archive/${TESS}.tar.gz \
  && tar -xzvf ${TESS}.tar.gz -C /tmp/tesseract \
  && mv /tmp/tesseract/* /tesseract
WORKDIR /tesseract

RUN ./autogen.sh \
  && ./configure \
  && make \
  && make install

# Recover location
WORKDIR /

# Load languages
RUN wget https://github.com/tesseract-ocr/tessdata/raw/master/eng.traineddata -P /usr/local/share/tessdata
RUN wget https://github.com/tesseract-ocr/tessdata/raw/master/deu.traineddata -P /usr/local/share/tessdata
RUN wget https://github.com/tesseract-ocr/tessdata/raw/master/fra.traineddata -P /usr/local/share/tessdata
RUN wget https://github.com/tesseract-ocr/tessdata/raw/master/spa.traineddata -P /usr/local/share/tessdata
RUN wget https://github.com/tesseract-ocr/tessdata/raw/master/jpn.traineddata -P /usr/local/share/tessdata

雑感

  • ブログのアウトプットが成果物だけという手抜き感がいなめない

DRYな備忘録として

atom command not found

Problem

# MacOS
% atom .
zsh: command not found: atom
% which atom
atom not found

Anything can’t exist without Atom

Research

Solution

% which atom
atom not found
% /Applications/Atom.app/Contents/Resources/app/atom.sh
# and close the window just opened
% which atom
/usr/local/bin/atom
% atom .

It works.

【Go言語】意地でもsliceをswitch-caseで比較したい

invalid case []byte literal in switch (can only compare slice foo to nil)

switch response[:4] {
case []byte{0,0,0,0}, []byte{1,0,0,0}, []byte{2,0,0,0}:
    fmt.Println("do something")
}
// これ動かないやつ

可変長であるsliceはnilとの比較だけが許されているようだ。固定長ならどうか?

やったこと

  1. 固定長arrayをつくる
  2. sliceとしてcopyにかける
  3. 固定長arrayと比較する
var header [4]byte
copy(header[:], response[:4])
switch header {
case [4]byte{0,0,0,0}, [4]byte{1,0,0,0,}, [4]byte{2,0,0,0}:
    fmt.Println("do something")
}

The Go Playground

DRYな備忘録として