DRYな備忘録

Don't Repeat Yourself.

【メモ】【NFS】DockerコンテナをクライアントとするNFSの疎通確認

背景

ログ

サーバは、同VPN内に立っている前提で、クライアントを作っていく。

# 準備
% docker-machine create \
--driver amazonec2 \
--amazonec2-region ap-northeast-1 \
--amazonec2-security-group otiai10-test \
otiai10-container-client-test
% eval $(docker-machine env otiai10-container-client-test)
% docker run -it --rm debian
root@1dd362335dc0:/# mkdir foobar
root@1dd362335dc0:/# mount 172.31.23.148:/root/export foobar
mount: permission denied

permission deniedと出る。

mount: permission denied

docker run--privilegedを追加。

% docker run -it --rm --privileged debian
root@eea3be2246c4:/# mkdir foobar
root@eea3be2246c4:/# mount 172.31.23.148:/root/export foobar
mount: wrong fs type, bad option, bad superblock on 172.31.23.148:/root/export,
       missing codepage or helper program, or other error
       (for several filesystems (e.g. nfs, cifs) you might
       need a /sbin/mount.<type> helper program)

       In some cases useful info is found in syslog - try
       dmesg | tail or so.

wrong fs typeと出る。

mount: wrong fs type

# さっきのつづき
root@eea3be2246c4:/# apt-get update -qq
root@eea3be2246c4:/# apt-get install -y nfs-common
root@eea3be2246c4:/# mount 172.31.23.148:/root/export foobar
root@eea3be2246c4:/#
# お、いったか?
root@eea3be2246c4:/# cat foobar/foobar.txt
おっぱい!
root@eea3be2246c4:/#

いきましたね。

まとめ

Dockerfile ↓

github.com

DRYな備忘録として

Docker入門

Docker入門

TCP IPとNFS―UNIXでのインターネットワーキング (アジソン ウェスレイ・トッパン情報科学シリーズ)

TCP IPとNFS―UNIXでのインターネットワーキング (アジソン ウェスレイ・トッパン情報科学シリーズ)

【AWS】EC2上にNFSサーバを構築する(最小要件)

背景

前回記事

otiai10.hatenablog.com

で、NFSサーバ構築の要素を検証したので、今回は最小要件実装を試す。とはいっても、デバイスの追加せず、ルートボリュームをマウントポイントとするだけの違い。

ログ

Webコンソールから、インスタンスの立ち上げ。この際、追加のEBSをアタッチしない。

% ssh -i ~/Documents/otiai10.tokyo.pem ec2-user@13.231.255.177
[ec2-user@ip-172-31-23-148 ~]$ sudo -s
[root@ip-172-31-23-148 ec2-user]# cd
[root@ip-172-31-23-148 ~]# pwd
/root
[root@ip-172-31-23-148 ~]# mkdir export
# マウントされるディレクトリを/root/exportとした
# 外部への公開
[root@ip-172-31-23-148 ~]# echo '/root/export *(rw,async,no_root_squash)' >> /etc/exports
[root@ip-172-31-23-148 ~]# systemctl status nfs
[root@ip-172-31-23-148 ~]# systemctl start nfs
[root@ip-172-31-23-148 ~]# exportfs -a -r
[root@ip-172-31-23-148 ~]# exportfs -v
/root/export      <world>(rw,async,wdelay,hide,no_subtree_check,sec=sys,secure,no_root_squash,no_all_squash)
[root@ip-172-31-23-148 ~]# systemctl status nfs
[root@ip-172-31-23-148 ~]# netstat -lntp | grep 2049
tcp        0      0 0.0.0.0:2049            0.0.0.0:*               LISTEN      -
tcp6       0      0 :::2049                 :::*                    LISTEN      -
[root@ip-172-31-23-148 ~]#

クライアント側から疎通確認。適当に、同SecurityGroup内に作る。このSecurityGroupは同SecurityGroup内同士の2049ポートが開いている。

% ssh -i ~/Documents/otiai10.tokyo.pem ec2-user@52.197.124.165
[ec2-user@ip-172-31-22-126 ~]$ mkdir mountpoint
[ec2-user@ip-172-31-22-126 ~]$ 
[ec2-user@ip-172-31-22-126 ~]$ sudo mount 172.31.23.148:/root/export ./mountpoint
[ec2-user@ip-172-31-22-126 ~]$ df -h
Filesystem                  Size  Used Avail Use% Mounted on
devtmpfs                    488M   60K  488M   1% /dev
tmpfs                       497M     0  497M   0% /dev/shm
/dev/xvda1                  7.8G  1.1G  6.7G  14% /
172.31.23.148:/root/export  8.0G 1016M  7.0G  13% /home/ec2-user/mountpoint

サーバ上でなんか書いたのち、再度クライアントで、

[ec2-user@ip-172-31-22-126 ~]$ ll mountpoint/
total 0
[ec2-user@ip-172-31-22-126 ~]$ ll mountpoint/
total 4
-rw-r--r-- 1 root root 16 Mar 12 05:49 foobar.txt
[ec2-user@ip-172-31-22-126 ~]$ cat mountpoint/foobar.txt
おっぱい!
[ec2-user@ip-172-31-22-126 ~]$

NFSマウントポイントの同期が確認された。

DRYな備忘録として

【AWS】EC2上にnfsサーバを構築する

tl;dr

まったく同じタイトルのものがあった

以下読まなくていいです。


nfsサーバ構築のログ

ウェブコンソールからインスタンスのローンチ

f:id:otiai10:20180308123503p:plain

マウントされるためのデバイスを追加した。

# ログイン
% ssh -i ~/Documents/otiai10.tokyo.pem ec2-user@18.182.13.38
[ec2-user@ip-172-31-30-22 ~]$ sudo su -
[root@ip-172-31-30-22 ~]# uname -a
Linux ip-172-31-30-22.ap-northeast-1.compute.internal 4.9.76-38.79.amzn2.x86_64 #1 SMP Mon Jan 15 23:35:15 UTC 2018 x86_64 x86_64 x86_64 GNU/Linux
# パッケージ確認
[root@ip-172-31-30-22 ~]# yum list | grep nfs-utils
nfs-utils.x86_64                        1:1.3.0-0.48.amzn2.0.1        installed
# ブロックデバイス一覧を確認
[root@ip-172-31-30-22 ~]# lsblk
NAME    MAJ:MIN RM SIZE RO TYPE MOUNTPOINT
xvda    202:0    0   8G  0 disk
└─xvda1 202:1    0   8G  0 part /
xvdb    202:16   0  16G  0 disk
# xvdbを使っていく

lsblk: 【 lsblk 】コマンド――ブロックデバイスを一覧表示する:Linux基本コマンドTips(180) - @IT

[root@ip-172-31-30-22 ~]# mkfs -t ext4 /dev/xvdb
# 中略
Allocating group tables: done
Writing inode tables: done
Creating journal (32768 blocks): done
Writing superblocks and filesystem accounting information: done

[root@ip-172-31-30-22 ~]#

mkfs: Linux パーティションにmkfsでファイルシステムを作る

# ローカルのディレクトリの確認
[root@ip-172-31-30-22 ~]# df -h
Filesystem      Size  Used Avail Use% Mounted on
devtmpfs        484M     0  484M   0% /dev
tmpfs           497M     0  497M   0% /dev/shm
tmpfs           497M   13M  484M   3% /run
tmpfs           497M     0  497M   0% /sys/fs/cgroup
/dev/xvda1      8.0G 1017M  7.0G  13% /
tmpfs           100M     0  100M   0% /run/user/1000
tmpfs           100M     0  100M   0% /run/user/0

# 上記のデバイスをローカルパスにマウントする設定を記述
[root@ip-172-31-30-22 ~]# cp /etc/fstab ~/fstab.backup
[root@ip-172-31-30-22 ~]# vi /etc/fstab
[root@ip-172-31-30-22 ~]# diff -u ~/fstab.backup /etc/fstab

diff ↓

 devpts      /dev/pts    devpts  gid=5,mode=620  0   0
 sysfs       /sys        sysfs   defaults        0   0
 proc        /proc       proc    defaults        0   0
+/dev/xvdb   /export/nfs ext4    defaults,nofail 1   2
# マウント
[root@ip-172-31-30-22 ~]# mkdir -p /export/nfs
[root@ip-172-31-30-22 ~]# mount /export/nfs

# 確認
[root@ip-172-31-30-22 ~]# df -h
Filesystem      Size  Used Avail Use% Mounted on
devtmpfs        484M     0  484M   0% /dev
tmpfs           497M     0  497M   0% /dev/shm
tmpfs           497M   13M  484M   3% /run
tmpfs           497M     0  497M   0% /sys/fs/cgroup
/dev/xvda1      8.0G 1017M  7.0G  13% /
tmpfs           100M     0  100M   0% /run/user/1000
tmpfs           100M     0  100M   0% /run/user/0
/dev/xvdb        16G   45M   15G   1% /export/nfs

/etc/fstab

# 外部ホストへの公開設定を記述
[root@ip-172-31-30-22 ~]# echo '/export/nfs *(rw,async,no_root_squash)'
/export/nfs *(rw,async,no_root_squash)
[root@ip-172-31-30-22 ~]# echo '/export/nfs *(rw,async,no_root_squash)' >> /etc/exports
# nfsサービスの開始
[root@ip-172-31-30-22 ~]# systemctl status nfs
[root@ip-172-31-30-22 ~]# systemctl start nfs
[root@ip-172-31-30-22 ~]# systemctl status nfs
[root@ip-172-31-30-22 ~]# exportfs -ar
# 確認
[root@ip-172-31-30-22 ~]# exportfs -v
/export/nfs     <world>(rw,async,wdelay,hide,no_subtree_check,sec=sys,secure,no_root_squash,no_all_squash)
[root@ip-172-31-30-22 ~]# showmount -e
Export list for ip-172-31-30-22.ap-northeast-1.compute.internal:
/export/nfs *
[root@ip-172-31-30-22 ~]#
# ポートの確認
[root@ip-172-31-30-22 ~]# netstat -lntp
Active Internet connections (only servers)
Proto Recv-Q Send-Q Local Address           Foreign Address         State       PID/Program name
tcp        0      0 0.0.0.0:111             0.0.0.0:*               LISTEN      1/systemd
tcp        0      0 0.0.0.0:20048           0.0.0.0:*               LISTEN      9137/rpc.mountd
tcp        0      0 0.0.0.0:22              0.0.0.0:*               LISTEN      3249/sshd
tcp        0      0 127.0.0.1:25            0.0.0.0:*               LISTEN      3092/master
tcp        0      0 0.0.0.0:60795           0.0.0.0:*               LISTEN      358/rpc.statd
tcp        0      0 0.0.0.0:37729           0.0.0.0:*               LISTEN      -
tcp        0      0 0.0.0.0:2049            0.0.0.0:*               LISTEN      -
tcp6       0      0 :::111                  :::*                    LISTEN      1/systemd
tcp6       0      0 :::20048                :::*                    LISTEN      9137/rpc.mountd
tcp6       0      0 :::22                   :::*                    LISTEN      3249/sshd
tcp6       0      0 :::37309                :::*                    LISTEN      -
tcp6       0      0 :::55325                :::*                    LISTEN      358/rpc.statd
tcp6       0      0 :::2049                 :::*                    LISTEN      -

Program nameが-なのが気になるけど、2049/tcpはLISTENになっている。

クライアント側からのmount確認

適当にクライアントとなるEC2インスタンスを同VPC内の同SecurityGroupで建てて、同SecurityGroup間でのNFSポート(2049)を開ける。
左がサーバ。右がクライアント。sample.txtという名前のファイルがネットワーク越しに同期しているのが確認できた。

f:id:otiai10:20180308160440p:plain

f:id:otiai10:20180308160844p:plain

Macからのマウントで、Operation not permitted

  1. クライアントインスタンスから、Public IP Addressで、マウントしようとすると、tcpが疎通していないような挙動になる
    • これは意味が分かる。Public IP Addressで参照しているということは、いったんVPCの外に出ているので、SecurityGroupに弾かれていると思われる。
  2. ためしに、当SGで一瞬すべてのSourceからのnfsを許してみると、クライアントインスタンスから Public IP Addressをもちいて nfs疎通が確認できた
  3. ローカルのMacから、Public IP Addressで、マウントしようとすると、Operation not permitted となる
    • SG的には、職場のIP AddressからAll protocol/trafficのinboundを許している
    • 上記[2]より、ネットワーク的なエラーではないと思われる
  4. Macのクライアントの設定だった

解決

sudo mount_nfs \
  -o resvport ${NFS_SERVER_PUBLIC_IP_ADDR}:/export/nfs \
  ./mountpoint

DRYな備忘録として

図解でわかる Linuxサーバ構築・設定のすべて

図解でわかる Linuxサーバ構築・設定のすべて

サーバ構築の実際がわかる Apache[実践]運用/管理 (Software Design plus)

サーバ構築の実際がわかる Apache[実践]運用/管理 (Software Design plus)

【React】画像がNotFoundのときimgタグごと表示せず存在を消す

目的

画像がサーバ上に無いとき、こうなる。

f:id:otiai10:20180308102437p:plain

画像がサーバ上に無いときは「見つからないよ!」という画像を出すのもかっこ悪いので、タグごと存在を消したい。こう。

f:id:otiai10:20180308102621p:plain

参考

コード

class Favicon extends Component {
  render() {
    return (
      <div ref={ref => this.root = ref}>
        <img
          src={this.props.url}
          onError={() => this.root.style.display = 'none'}
        />
      </div>
    );
  }
}

やってること

  1. 消したいものをrefとして取得しておく
    • デザインの都合上、imgのひとつ上のdivを採っているが、imgそのものでもよい
  2. imgタグのonerrorプロパティを使って、上記refを消す
    • 試してないけど、.remove()でもいけるかな

そのコミット

github.com

雑感

DRYな備忘録として

作りながら学ぶ React入門

作りながら学ぶ React入門

Reactビギナーズガイド ―コンポーネントベースのフロントエンド開発入門

Reactビギナーズガイド ―コンポーネントベースのフロントエンド開発入門

【Go言語】aws-sdk-goでGoからEC2インスタンスの作成

注意: EC2インスタンスローンチ直後はPublicIPAddressがassociateされていないので、再帰的に時間とりつつDescribeInstanceしています。(func ensureの部分)

package main

import (
    "flag"
    "fmt"
    "log"
    "time"

    "github.com/aws/aws-sdk-go/aws"
    "github.com/aws/aws-sdk-go/aws/session"
    "github.com/aws/aws-sdk-go/service/ec2"
    "github.com/otiai10/stackerr"
)

var (
    region        string
    name          string
    securitygroup string
    keyname       string
    description   string
    clean         bool
)

func init() {
    flag.StringVar(&region, "region", "ap-northeast-1", "Region")
    flag.StringVar(&name, "name", "Test-Instance-SDK-Go", "Instance Name")
    flag.StringVar(&securitygroup, "sg", "", "SecurityGroup Name")
    flag.StringVar(&keyname, "keyname", "", "Key Pair Name")
    flag.BoolVar(&clean, "clean", false, "DEBUG: clean up existing SG")
    flag.Parse()
}

func validate() error {
    err := stackerr.New()
    if securitygroup == "" {
        err.Pushf("SecurityGroup is required: Use `-sg YourSecurityGroupName`")
    }
    if keyname == "" {
        err.Pushf("Key Pair Name is required: Use `-keyname YourKeyPairName`")
    }
    return err.Err()
}

func main() {

    if err := validate(); err != nil {
        log.Fatalf("ValidationError:\n%v", err)
    }

    sess := session.New(&aws.Config{
        Region: aws.String(region),
    })
    client := ec2.New(sess)

    out, err := client.RunInstances(&ec2.RunInstancesInput{
        InstanceType:   aws.String("t2.micro"),
        SecurityGroups: []*string{&securitygroup},
        ImageId:        aws.String("ami-c2680fa4"),
        KeyName:        aws.String(keyname),
        MaxCount:       aws.Int64(1),
        MinCount:       aws.Int64(1),
        TagSpecifications: []*ec2.TagSpecification{
            {
                ResourceType: aws.String("instance"),
                Tags: []*ec2.Tag{
                    {Key: aws.String("Name"), Value: &name},
                },
            },
        },
    })
    if err != nil {
        log.Fatalln("RunInstances Error:\n", err)
    }
    if len(out.Instances) == 0 {
        log.Fatalln("No instances created")
    }
    instance := out.Instances[0]
    fmt.Printf("Successfully created instance: %s\n", *instance.InstanceId)

    // Defer cleanup
    if clean {
        defer cleanup(client, instance.InstanceId)
    }

    instance, err = ensure(client, instance.InstanceId, 2)
    if err != nil {
        log.Println("DescribeInstances Error:\n", err)
        return
    }

    fmt.Printf(`Next:
    SSH:        ssh -i file/path/to/%s.pem ec2-user@%s
    Terminate:  aws ec2 terminate-instances --instance-id %s

`, *instance.KeyName, *instance.PublicIpAddress, *instance.InstanceId)
}

func cleanup(client *ec2.EC2, id *string) {
    out, err := client.TerminateInstances(&ec2.TerminateInstancesInput{
        InstanceIds: []*string{id},
    })
    fmt.Printf("Terminated by -clean option: ID:%+v Error:%v\n", *out.TerminatingInstances[0].InstanceId, err)
}

func ensure(client *ec2.EC2, id *string, waitsecond int) (*ec2.Instance, error) {
    if waitsecond > 60 {
        return nil, fmt.Errorf("Max retry for DescribeInstances exeeded: %d seconds", waitsecond)
    }
    fmt.Printf("Trying to fetch Public IP Address by DescribeInstances... (Retry after %d sec)\n", waitsecond)
    res, err := client.DescribeInstances(&ec2.DescribeInstancesInput{InstanceIds: []*string{id}})
    if err != nil {
        return nil, err
    }
    // TODO: check length
    instance := res.Reservations[0].Instances[0]
    if instance.PublicIpAddress == nil {
        time.Sleep(time.Duration(waitsecond) * time.Second)
        return ensure(client, id, waitsecond+waitsecond)
    }
    return instance, nil
}

repoあるんでスターください。

github.com

みんなのGo言語【現場で使える実践テクニック】

みんなのGo言語【現場で使える実践テクニック】

スターティングGo言語

スターティングGo言語

Amazon Web Servicesではじめる新米プログラマのためのクラウド超入門

Amazon Web Servicesではじめる新米プログラマのためのクラウド超入門

【メモ】AWS CLIでEC2インスタンスの作成

aws ec2 run-instances help

必須パラメータと予想されるもの

  • machine image
  • instance type
  • public static IP address on/off
  • server key
# machine imageの確認
% aws ec2 describe-images \
  --image-ids ami-c2680fa4 \
  --region ap-northeast-1

# key pairの作成
% aws ec2 create-key-pair \
  --key-name otiai10-test01 \
  --region ap-northeast-1

# このAPI responseのKeyMaterialをpemファイルにする。
# "\n" を改行にするのを忘れずに(vim参考 :%s/\\n/\r/gc )
% vi otiai10-test01.pem

# Instance作成
% aws ec2 run-instances \
  --image-id ami-c2680fa4 \
  --region ap-northeast-1 \
  --key-name otiai10-test01 \
  --associate-public-ip-address \
  --instance-type t2.micro

# 上記のAPI responseにInstanceIdが含まれるので
# Instanceのステータス確認
% aws ec2 describe-instances \
  --instance-ids i-0206ac48893ced2f5 \
  --region ap-northeast-1

# ssh疎通確認
% ssh -i ./otiai10-test01.pem \
  ec2-user@54.249.19.62
ssh: connect to host 54.249.19.62 port 22: Operation timed out
# あーそういやSecurityGroup忘れてた
# SG指定しないと、default Security Groupになっている。
# めんどくさいので、My IPからのAll Trafficを開ける。

# 再度ssh疎通確認
% ssh -i ./otiai10-test01.pem ec2-user@54.249.19.62
@@@@@@@@@@@@@@@@@@@@@@@@@@@@@@@@@@@@@@@@@@@@@@@@@@@@@@@@@@@
@         WARNING: UNPROTECTED PRIVATE KEY FILE!          @
@@@@@@@@@@@@@@@@@@@@@@@@@@@@@@@@@@@@@@@@@@@@@@@@@@@@@@@@@@@
Permissions 0644 for './otiai10-test01.pem' are too open.
It is required that your private key files are NOT accessible by others.
This private key will be ignored.
Load key "./otiai10-test01.pem": bad permissions
Permission denied (publickey,gssapi-keyex,gssapi-with-mic).
# あーめんどくせえ

# pemファイルのpermission変更
% chmod 600 ./otiai10-test01.pem

# ssh疎通確認、三度目の正直
% ssh -i ./otiai10-test01.pem ec2-user@54.249.19.62

       __|  __|_  )
       _|  (     /   Amazon Linux 2 AMI
      ___|\___|___|

https://aws.amazon.com/amazon-linux-2/
No packages needed for security; 15 packages available
Run "sudo yum update" to apply all updates.
[ec2-user@ip-172-31-17-228 ~]$ uname -a
Linux ip-172-31-17-228.ap-northeast-1.compute.internal 4.9.76-38.79.amzn2.x86_64 #1 SMP Mon Jan 15 23:35:15 UTC 2018 x86_64 x86_64 x86_64 GNU/Linux
[ec2-user@ip-172-31-17-228 ~]$
[ec2-user@ip-172-31-17-228 ~]$ exit
logout
Connection to 54.249.19.62 closed.
%

いいですね。掃除しましょう。

# インスタンスの破棄
% aws ec2 terminate-instances \
  --instance-ids i-0206ac48893ced2f5 \
  --region ap-northeast-1

# key pairの削除
% aws ec2 delete-key-pair \
  --key-name otiai10-test01 \
  --region ap-northeast-1

# 上記のコマンドにレスポンスが無いので確認
% aws ec2 describe-key-pairs --key-name otiai10-test01 --region ap-northeast-1

An error occurred (InvalidKeyPair.NotFound) when calling the DescribeKeyPairs operation: The key pair 'otiai10-test01' does not exist
%

% rm otiai10-test01.pem

いいですね。

Amazon Web Servicesではじめる新米プログラマのためのクラウド超入門

Amazon Web Servicesではじめる新米プログラマのためのクラウド超入門

Amazon Web Services パターン別構築・運用ガイド 改訂第2版

Amazon Web Services パターン別構築・運用ガイド 改訂第2版

AWSエキスパート養成読本[Amazon Web Servicesに最適化されたアーキテクチャを手に入れる! ] (Software Design plus)

AWSエキスパート養成読本[Amazon Web Servicesに最適化されたアーキテクチャを手に入れる! ] (Software Design plus)

追記

regionの指定めんどいので

aws configure set default.region ap-northeast-1

【メモ】【AWS】EBSの作成とEC2へのアタッチとマウント(手作業バージョン)

EBSのアタッチとマウントって違う概念だったのか。一発かと思ってた。

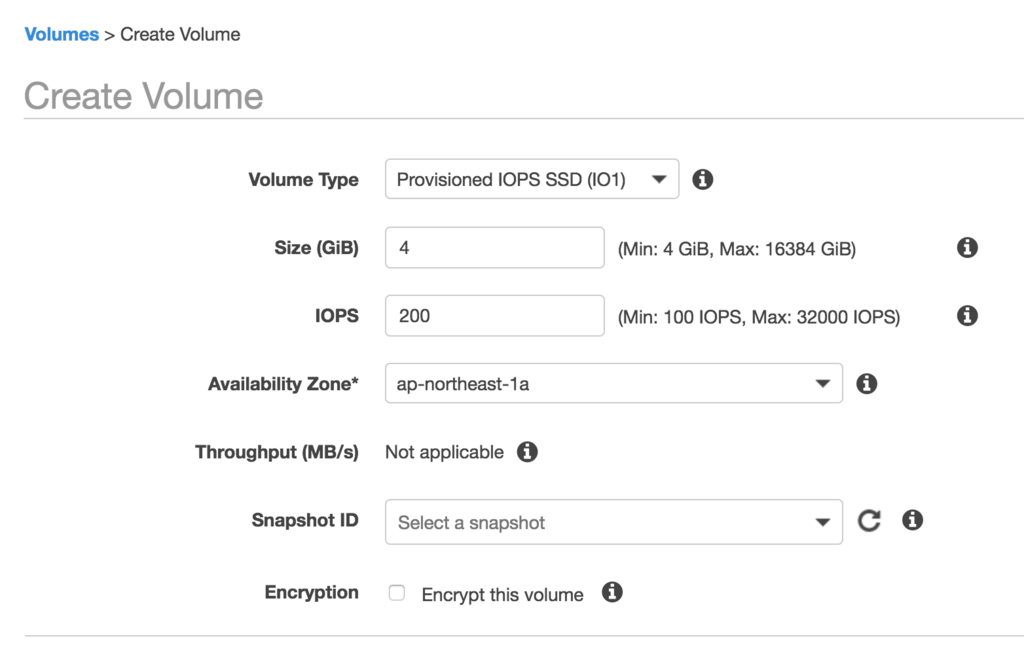
EBS作成

f:id:otiai10:20180227163449p:plain

EBS Volume ID: vol-07f6e7b9781aa7566

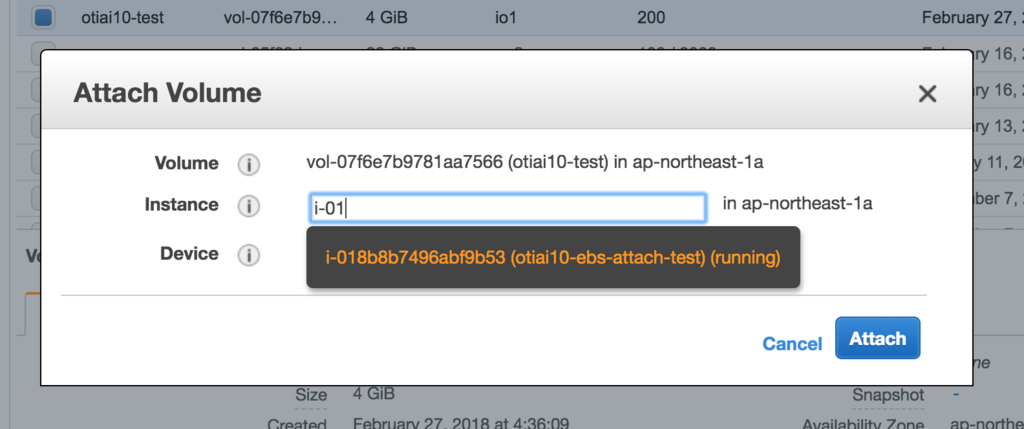
EBSのアタッチ

その前に、このEBSをアタッチする先のEC2インスタンスをつくる。

EC2 Instance ID: i-018b8b7496abf9b53

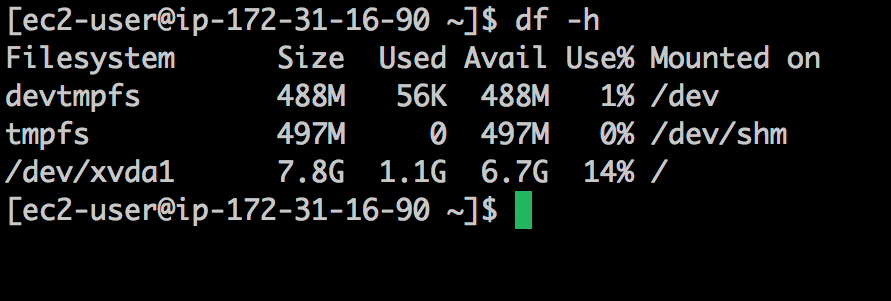
f:id:otiai10:20180227164900p:plain

Root Disk Size 8G で作ったのでこんなもんだと思う。

f:id:otiai10:20180227165503p:plain

f:id:otiai10:20180227165123p:plain

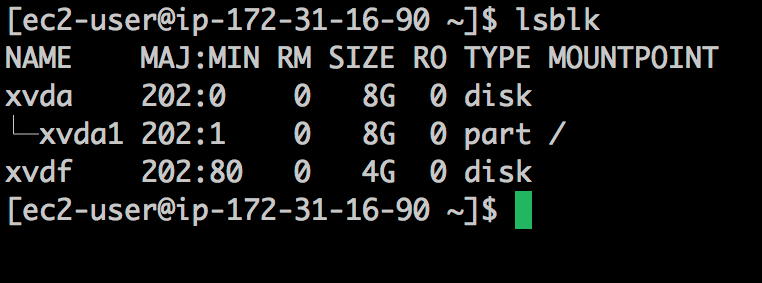
f:id:otiai10:20180227165812p:plain

f:id:otiai10:20180227170729p:plain

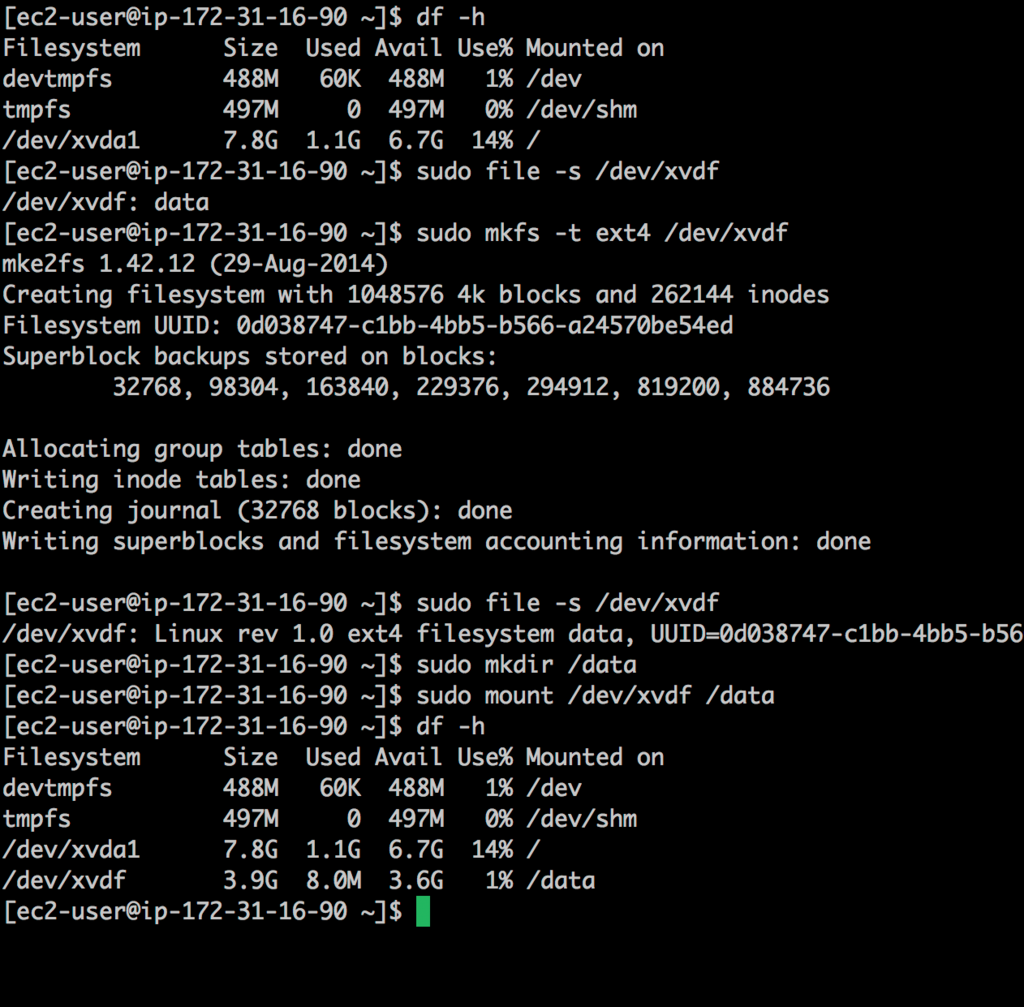
バイスは認識されているが、dfには来ない。マウントされてないから。

バイスをマウント

f:id:otiai10:20180227173316p:plain

利用可能なfsとして認識されていることが分かる。

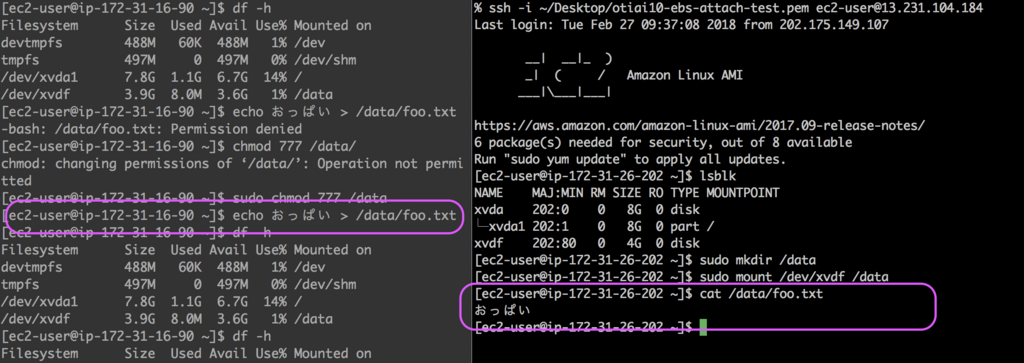
EBSの再利用のテスト

  1. インスタンスBにも、EBS Xをアタッチ&マウントする
  2. インスタンスAにアタッチされているEBS Xに、何か書き込む
  3. インスタンスBから、EBS Xのマウントポイントのコンテンツを確認

f:id:otiai10:20180227184019p:plain

雑だけど、同EBS内のオブジェクトを、インスタンスをスイッチして確認できた。

DRY