DRYな備忘録

Don't Repeat Yourself.

【AWS】EC2上にnfsサーバを構築する

tl;dr

まったく同じタイトルのものがあった

以下読まなくていいです。


nfsサーバ構築のログ

ウェブコンソールからインスタンスのローンチ

f:id:otiai10:20180308123503p:plain

マウントされるためのデバイスを追加した。

# ログイン
% ssh -i ~/Documents/otiai10.tokyo.pem ec2-user@18.182.13.38
[ec2-user@ip-172-31-30-22 ~]$ sudo su -
[root@ip-172-31-30-22 ~]# uname -a
Linux ip-172-31-30-22.ap-northeast-1.compute.internal 4.9.76-38.79.amzn2.x86_64 #1 SMP Mon Jan 15 23:35:15 UTC 2018 x86_64 x86_64 x86_64 GNU/Linux
# パッケージ確認
[root@ip-172-31-30-22 ~]# yum list | grep nfs-utils
nfs-utils.x86_64                        1:1.3.0-0.48.amzn2.0.1        installed
# ブロックデバイス一覧を確認
[root@ip-172-31-30-22 ~]# lsblk
NAME    MAJ:MIN RM SIZE RO TYPE MOUNTPOINT
xvda    202:0    0   8G  0 disk
└─xvda1 202:1    0   8G  0 part /
xvdb    202:16   0  16G  0 disk
# xvdbを使っていく

lsblk: 【 lsblk 】コマンド――ブロックデバイスを一覧表示する:Linux基本コマンドTips(180) - @IT

[root@ip-172-31-30-22 ~]# mkfs -t ext4 /dev/xvdb
# 中略
Allocating group tables: done
Writing inode tables: done
Creating journal (32768 blocks): done
Writing superblocks and filesystem accounting information: done

[root@ip-172-31-30-22 ~]#

mkfs: Linux パーティションにmkfsでファイルシステムを作る

# ローカルのディレクトリの確認
[root@ip-172-31-30-22 ~]# df -h
Filesystem      Size  Used Avail Use% Mounted on
devtmpfs        484M     0  484M   0% /dev
tmpfs           497M     0  497M   0% /dev/shm
tmpfs           497M   13M  484M   3% /run
tmpfs           497M     0  497M   0% /sys/fs/cgroup
/dev/xvda1      8.0G 1017M  7.0G  13% /
tmpfs           100M     0  100M   0% /run/user/1000
tmpfs           100M     0  100M   0% /run/user/0

# 上記のデバイスをローカルパスにマウントする設定を記述
[root@ip-172-31-30-22 ~]# cp /etc/fstab ~/fstab.backup
[root@ip-172-31-30-22 ~]# vi /etc/fstab
[root@ip-172-31-30-22 ~]# diff -u ~/fstab.backup /etc/fstab

diff ↓

 devpts      /dev/pts    devpts  gid=5,mode=620  0   0
 sysfs       /sys        sysfs   defaults        0   0
 proc        /proc       proc    defaults        0   0
+/dev/xvdb   /export/nfs ext4    defaults,nofail 1   2
# マウント
[root@ip-172-31-30-22 ~]# mkdir -p /export/nfs
[root@ip-172-31-30-22 ~]# mount /export/nfs

# 確認
[root@ip-172-31-30-22 ~]# df -h
Filesystem      Size  Used Avail Use% Mounted on
devtmpfs        484M     0  484M   0% /dev
tmpfs           497M     0  497M   0% /dev/shm
tmpfs           497M   13M  484M   3% /run
tmpfs           497M     0  497M   0% /sys/fs/cgroup
/dev/xvda1      8.0G 1017M  7.0G  13% /
tmpfs           100M     0  100M   0% /run/user/1000
tmpfs           100M     0  100M   0% /run/user/0
/dev/xvdb        16G   45M   15G   1% /export/nfs

/etc/fstab

# 外部ホストへの公開設定を記述
[root@ip-172-31-30-22 ~]# echo '/export/nfs *(rw,async,no_root_squash)'
/export/nfs *(rw,async,no_root_squash)
[root@ip-172-31-30-22 ~]# echo '/export/nfs *(rw,async,no_root_squash)' >> /etc/exports
# nfsサービスの開始
[root@ip-172-31-30-22 ~]# systemctl status nfs
[root@ip-172-31-30-22 ~]# systemctl start nfs
[root@ip-172-31-30-22 ~]# systemctl status nfs
[root@ip-172-31-30-22 ~]# exportfs -ar
# 確認
[root@ip-172-31-30-22 ~]# exportfs -v
/export/nfs     <world>(rw,async,wdelay,hide,no_subtree_check,sec=sys,secure,no_root_squash,no_all_squash)
[root@ip-172-31-30-22 ~]# showmount -e
Export list for ip-172-31-30-22.ap-northeast-1.compute.internal:
/export/nfs *
[root@ip-172-31-30-22 ~]#
# ポートの確認
[root@ip-172-31-30-22 ~]# netstat -lntp
Active Internet connections (only servers)
Proto Recv-Q Send-Q Local Address           Foreign Address         State       PID/Program name
tcp        0      0 0.0.0.0:111             0.0.0.0:*               LISTEN      1/systemd
tcp        0      0 0.0.0.0:20048           0.0.0.0:*               LISTEN      9137/rpc.mountd
tcp        0      0 0.0.0.0:22              0.0.0.0:*               LISTEN      3249/sshd
tcp        0      0 127.0.0.1:25            0.0.0.0:*               LISTEN      3092/master
tcp        0      0 0.0.0.0:60795           0.0.0.0:*               LISTEN      358/rpc.statd
tcp        0      0 0.0.0.0:37729           0.0.0.0:*               LISTEN      -
tcp        0      0 0.0.0.0:2049            0.0.0.0:*               LISTEN      -
tcp6       0      0 :::111                  :::*                    LISTEN      1/systemd
tcp6       0      0 :::20048                :::*                    LISTEN      9137/rpc.mountd
tcp6       0      0 :::22                   :::*                    LISTEN      3249/sshd
tcp6       0      0 :::37309                :::*                    LISTEN      -
tcp6       0      0 :::55325                :::*                    LISTEN      358/rpc.statd
tcp6       0      0 :::2049                 :::*                    LISTEN      -

Program nameが-なのが気になるけど、2049/tcpはLISTENになっている。

クライアント側からのmount確認

適当にクライアントとなるEC2インスタンスを同VPC内の同SecurityGroupで建てて、同SecurityGroup間でのNFSポート(2049)を開ける。
左がサーバ。右がクライアント。sample.txtという名前のファイルがネットワーク越しに同期しているのが確認できた。

f:id:otiai10:20180308160440p:plain

f:id:otiai10:20180308160844p:plain

Macからのマウントで、Operation not permitted

  1. クライアントインスタンスから、Public IP Addressで、マウントしようとすると、tcpが疎通していないような挙動になる
    • これは意味が分かる。Public IP Addressで参照しているということは、いったんVPCの外に出ているので、SecurityGroupに弾かれていると思われる。
  2. ためしに、当SGで一瞬すべてのSourceからのnfsを許してみると、クライアントインスタンスから Public IP Addressをもちいて nfs疎通が確認できた
  3. ローカルのMacから、Public IP Addressで、マウントしようとすると、Operation not permitted となる
    • SG的には、職場のIP AddressからAll protocol/trafficのinboundを許している
    • 上記[2]より、ネットワーク的なエラーではないと思われる
  4. Macのクライアントの設定だった

解決

sudo mount_nfs \
  -o resvport ${NFS_SERVER_PUBLIC_IP_ADDR}:/export/nfs \
  ./mountpoint

DRYな備忘録として

図解でわかる Linuxサーバ構築・設定のすべて

図解でわかる Linuxサーバ構築・設定のすべて

サーバ構築の実際がわかる Apache[実践]運用/管理 (Software Design plus)

サーバ構築の実際がわかる Apache[実践]運用/管理 (Software Design plus)

【React】画像がNotFoundのときimgタグごと表示せず存在を消す

目的

画像がサーバ上に無いとき、こうなる。

f:id:otiai10:20180308102437p:plain

画像がサーバ上に無いときは「見つからないよ!」という画像を出すのもかっこ悪いので、タグごと存在を消したい。こう。

f:id:otiai10:20180308102621p:plain

参考

コード

class Favicon extends Component {
  render() {
    return (
      <div ref={ref => this.root = ref}>
        <img
          src={this.props.url}
          onError={() => this.root.style.display = 'none'}
        />
      </div>
    );
  }
}

やってること

  1. 消したいものをrefとして取得しておく
    • デザインの都合上、imgのひとつ上のdivを採っているが、imgそのものでもよい
  2. imgタグのonerrorプロパティを使って、上記refを消す
    • 試してないけど、.remove()でもいけるかな

そのコミット

github.com

雑感

DRYな備忘録として

作りながら学ぶ React入門

作りながら学ぶ React入門

Reactビギナーズガイド ―コンポーネントベースのフロントエンド開発入門

Reactビギナーズガイド ―コンポーネントベースのフロントエンド開発入門

【Go言語】aws-sdk-goでGoからEC2インスタンスの作成

注意: EC2インスタンスローンチ直後はPublicIPAddressがassociateされていないので、再帰的に時間とりつつDescribeInstanceしています。(func ensureの部分)

package main

import (
    "flag"
    "fmt"
    "log"
    "time"

    "github.com/aws/aws-sdk-go/aws"
    "github.com/aws/aws-sdk-go/aws/session"
    "github.com/aws/aws-sdk-go/service/ec2"
    "github.com/otiai10/stackerr"
)

var (
    region        string
    name          string
    securitygroup string
    keyname       string
    description   string
    clean         bool
)

func init() {
    flag.StringVar(&region, "region", "ap-northeast-1", "Region")
    flag.StringVar(&name, "name", "Test-Instance-SDK-Go", "Instance Name")
    flag.StringVar(&securitygroup, "sg", "", "SecurityGroup Name")
    flag.StringVar(&keyname, "keyname", "", "Key Pair Name")
    flag.BoolVar(&clean, "clean", false, "DEBUG: clean up existing SG")
    flag.Parse()
}

func validate() error {
    err := stackerr.New()
    if securitygroup == "" {
        err.Pushf("SecurityGroup is required: Use `-sg YourSecurityGroupName`")
    }
    if keyname == "" {
        err.Pushf("Key Pair Name is required: Use `-keyname YourKeyPairName`")
    }
    return err.Err()
}

func main() {

    if err := validate(); err != nil {
        log.Fatalf("ValidationError:\n%v", err)
    }

    sess := session.New(&aws.Config{
        Region: aws.String(region),
    })
    client := ec2.New(sess)

    out, err := client.RunInstances(&ec2.RunInstancesInput{
        InstanceType:   aws.String("t2.micro"),
        SecurityGroups: []*string{&securitygroup},
        ImageId:        aws.String("ami-c2680fa4"),
        KeyName:        aws.String(keyname),
        MaxCount:       aws.Int64(1),
        MinCount:       aws.Int64(1),
        TagSpecifications: []*ec2.TagSpecification{
            {
                ResourceType: aws.String("instance"),
                Tags: []*ec2.Tag{
                    {Key: aws.String("Name"), Value: &name},
                },
            },
        },
    })
    if err != nil {
        log.Fatalln("RunInstances Error:\n", err)
    }
    if len(out.Instances) == 0 {
        log.Fatalln("No instances created")
    }
    instance := out.Instances[0]
    fmt.Printf("Successfully created instance: %s\n", *instance.InstanceId)

    // Defer cleanup
    if clean {
        defer cleanup(client, instance.InstanceId)
    }

    instance, err = ensure(client, instance.InstanceId, 2)
    if err != nil {
        log.Println("DescribeInstances Error:\n", err)
        return
    }

    fmt.Printf(`Next:
    SSH:        ssh -i file/path/to/%s.pem ec2-user@%s
    Terminate:  aws ec2 terminate-instances --instance-id %s

`, *instance.KeyName, *instance.PublicIpAddress, *instance.InstanceId)
}

func cleanup(client *ec2.EC2, id *string) {
    out, err := client.TerminateInstances(&ec2.TerminateInstancesInput{
        InstanceIds: []*string{id},
    })
    fmt.Printf("Terminated by -clean option: ID:%+v Error:%v\n", *out.TerminatingInstances[0].InstanceId, err)
}

func ensure(client *ec2.EC2, id *string, waitsecond int) (*ec2.Instance, error) {
    if waitsecond > 60 {
        return nil, fmt.Errorf("Max retry for DescribeInstances exeeded: %d seconds", waitsecond)
    }
    fmt.Printf("Trying to fetch Public IP Address by DescribeInstances... (Retry after %d sec)\n", waitsecond)
    res, err := client.DescribeInstances(&ec2.DescribeInstancesInput{InstanceIds: []*string{id}})
    if err != nil {
        return nil, err
    }
    // TODO: check length
    instance := res.Reservations[0].Instances[0]
    if instance.PublicIpAddress == nil {
        time.Sleep(time.Duration(waitsecond) * time.Second)
        return ensure(client, id, waitsecond+waitsecond)
    }
    return instance, nil
}

repoあるんでスターください。

github.com

みんなのGo言語【現場で使える実践テクニック】

みんなのGo言語【現場で使える実践テクニック】

スターティングGo言語

スターティングGo言語

Amazon Web Servicesではじめる新米プログラマのためのクラウド超入門

Amazon Web Servicesではじめる新米プログラマのためのクラウド超入門

【メモ】AWS CLIでEC2インスタンスの作成

aws ec2 run-instances help

必須パラメータと予想されるもの

  • machine image
  • instance type
  • public static IP address on/off
  • server key
# machine imageの確認
% aws ec2 describe-images \
  --image-ids ami-c2680fa4 \
  --region ap-northeast-1

# key pairの作成
% aws ec2 create-key-pair \
  --key-name otiai10-test01 \
  --region ap-northeast-1

# このAPI responseのKeyMaterialをpemファイルにする。
# "\n" を改行にするのを忘れずに(vim参考 :%s/\\n/\r/gc )
% vi otiai10-test01.pem

# Instance作成
% aws ec2 run-instances \
  --image-id ami-c2680fa4 \
  --region ap-northeast-1 \
  --key-name otiai10-test01 \
  --associate-public-ip-address \
  --instance-type t2.micro

# 上記のAPI responseにInstanceIdが含まれるので
# Instanceのステータス確認
% aws ec2 describe-instances \
  --instance-ids i-0206ac48893ced2f5 \
  --region ap-northeast-1

# ssh疎通確認
% ssh -i ./otiai10-test01.pem \
  ec2-user@54.249.19.62
ssh: connect to host 54.249.19.62 port 22: Operation timed out
# あーそういやSecurityGroup忘れてた
# SG指定しないと、default Security Groupになっている。
# めんどくさいので、My IPからのAll Trafficを開ける。

# 再度ssh疎通確認
% ssh -i ./otiai10-test01.pem ec2-user@54.249.19.62
@@@@@@@@@@@@@@@@@@@@@@@@@@@@@@@@@@@@@@@@@@@@@@@@@@@@@@@@@@@
@         WARNING: UNPROTECTED PRIVATE KEY FILE!          @
@@@@@@@@@@@@@@@@@@@@@@@@@@@@@@@@@@@@@@@@@@@@@@@@@@@@@@@@@@@
Permissions 0644 for './otiai10-test01.pem' are too open.
It is required that your private key files are NOT accessible by others.
This private key will be ignored.
Load key "./otiai10-test01.pem": bad permissions
Permission denied (publickey,gssapi-keyex,gssapi-with-mic).
# あーめんどくせえ

# pemファイルのpermission変更
% chmod 600 ./otiai10-test01.pem

# ssh疎通確認、三度目の正直
% ssh -i ./otiai10-test01.pem ec2-user@54.249.19.62

       __|  __|_  )
       _|  (     /   Amazon Linux 2 AMI
      ___|\___|___|

https://aws.amazon.com/amazon-linux-2/
No packages needed for security; 15 packages available
Run "sudo yum update" to apply all updates.
[ec2-user@ip-172-31-17-228 ~]$ uname -a
Linux ip-172-31-17-228.ap-northeast-1.compute.internal 4.9.76-38.79.amzn2.x86_64 #1 SMP Mon Jan 15 23:35:15 UTC 2018 x86_64 x86_64 x86_64 GNU/Linux
[ec2-user@ip-172-31-17-228 ~]$
[ec2-user@ip-172-31-17-228 ~]$ exit
logout
Connection to 54.249.19.62 closed.
%

いいですね。掃除しましょう。

# インスタンスの破棄
% aws ec2 terminate-instances \
  --instance-ids i-0206ac48893ced2f5 \
  --region ap-northeast-1

# key pairの削除
% aws ec2 delete-key-pair \
  --key-name otiai10-test01 \
  --region ap-northeast-1

# 上記のコマンドにレスポンスが無いので確認
% aws ec2 describe-key-pairs --key-name otiai10-test01 --region ap-northeast-1

An error occurred (InvalidKeyPair.NotFound) when calling the DescribeKeyPairs operation: The key pair 'otiai10-test01' does not exist
%

% rm otiai10-test01.pem

いいですね。

Amazon Web Servicesではじめる新米プログラマのためのクラウド超入門

Amazon Web Servicesではじめる新米プログラマのためのクラウド超入門

Amazon Web Services パターン別構築・運用ガイド 改訂第2版

Amazon Web Services パターン別構築・運用ガイド 改訂第2版

AWSエキスパート養成読本[Amazon Web Servicesに最適化されたアーキテクチャを手に入れる! ] (Software Design plus)

AWSエキスパート養成読本[Amazon Web Servicesに最適化されたアーキテクチャを手に入れる! ] (Software Design plus)

追記

regionの指定めんどいので

aws configure set default.region ap-northeast-1

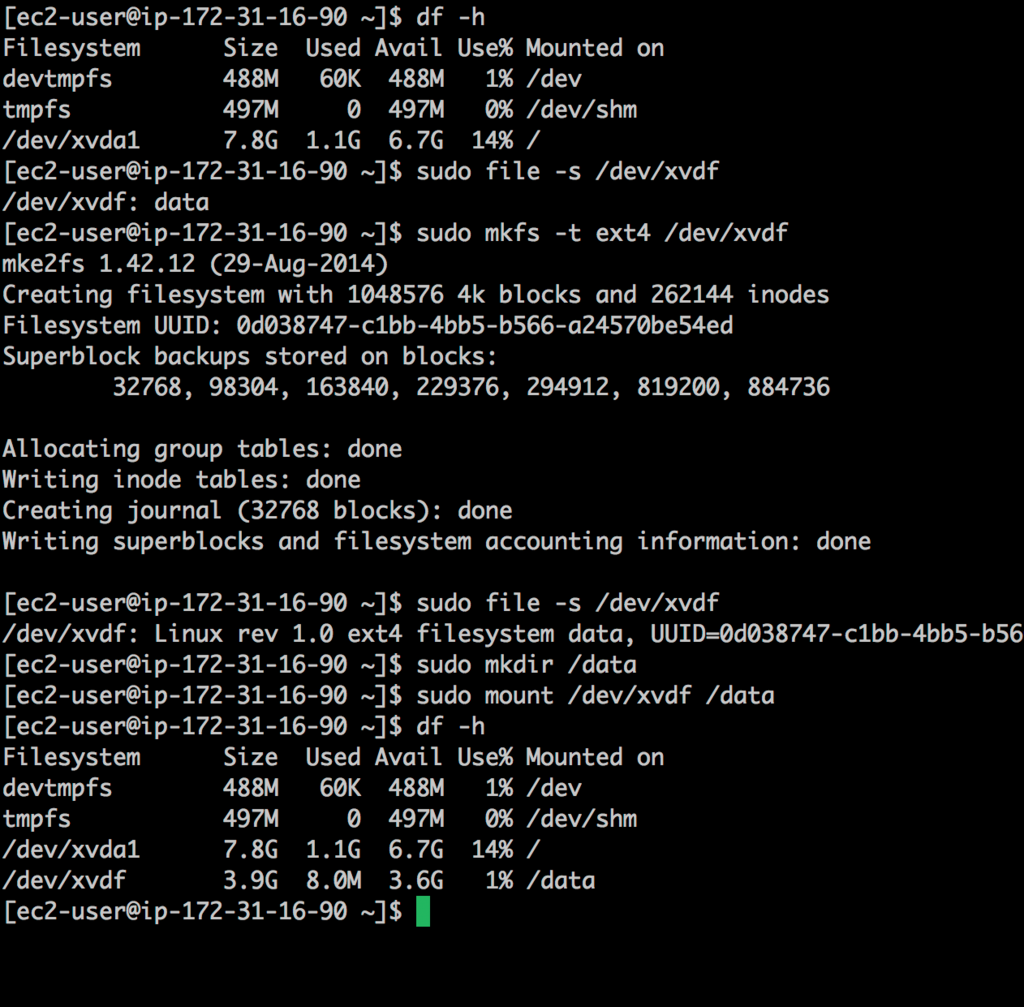
【メモ】【AWS】EBSの作成とEC2へのアタッチとマウント(手作業バージョン)

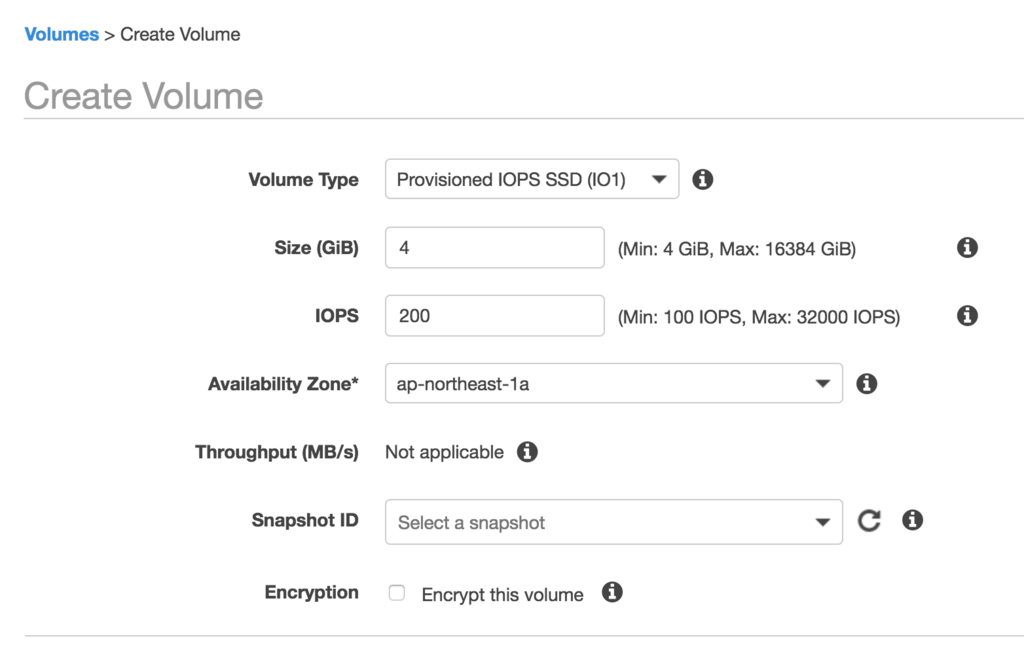
EBSのアタッチとマウントって違う概念だったのか。一発かと思ってた。

EBS作成

f:id:otiai10:20180227163449p:plain

EBS Volume ID: vol-07f6e7b9781aa7566

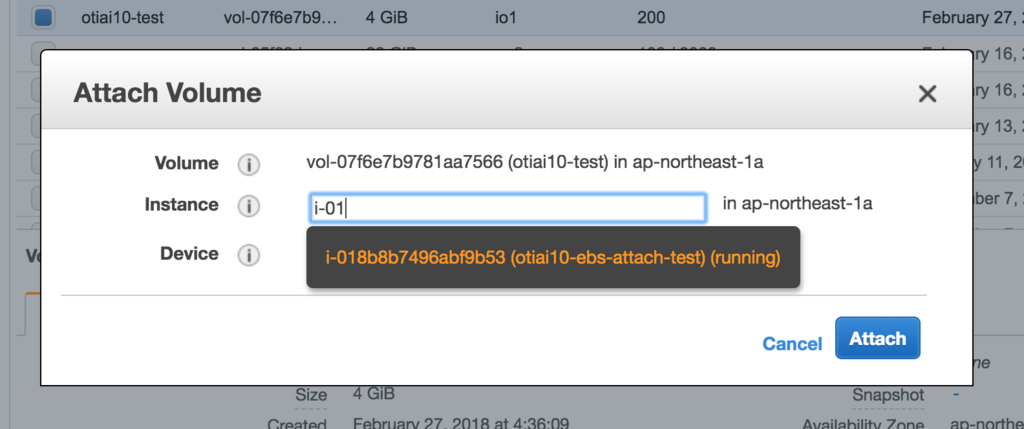
EBSのアタッチ

その前に、このEBSをアタッチする先のEC2インスタンスをつくる。

EC2 Instance ID: i-018b8b7496abf9b53

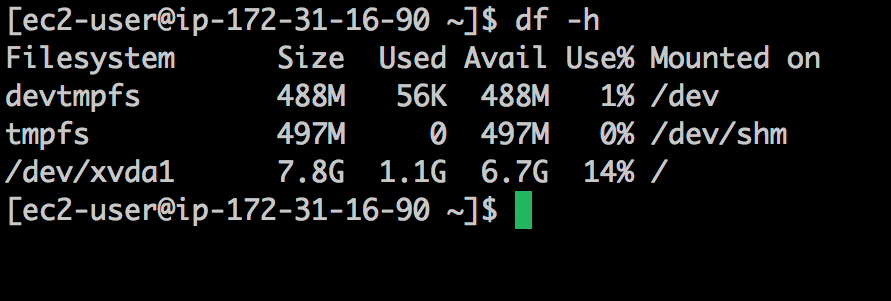
f:id:otiai10:20180227164900p:plain

Root Disk Size 8G で作ったのでこんなもんだと思う。

f:id:otiai10:20180227165503p:plain

f:id:otiai10:20180227165123p:plain

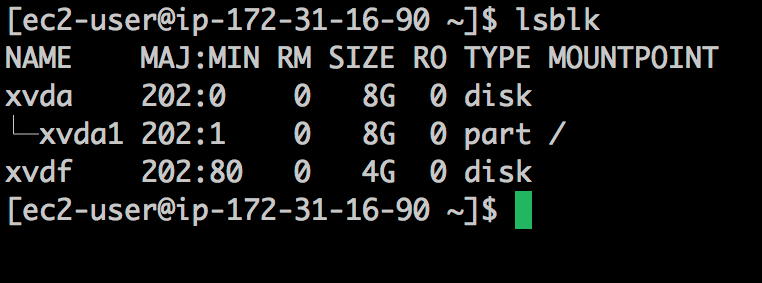
f:id:otiai10:20180227165812p:plain

f:id:otiai10:20180227170729p:plain

バイスは認識されているが、dfには来ない。マウントされてないから。

バイスをマウント

f:id:otiai10:20180227173316p:plain

利用可能なfsとして認識されていることが分かる。

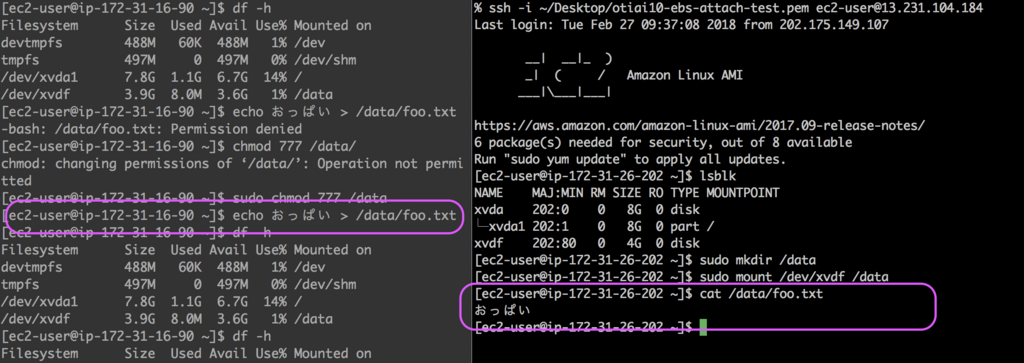
EBSの再利用のテスト

  1. インスタンスBにも、EBS Xをアタッチ&マウントする
  2. インスタンスAにアタッチされているEBS Xに、何か書き込む
  3. インスタンスBから、EBS Xのマウントポイントのコンテンツを確認

f:id:otiai10:20180227184019p:plain

雑だけど、同EBS内のオブジェクトを、インスタンスをスイッチして確認できた。

DRY

rustc、cargo、rustup、rustfmtなどのインストール

前回のエントリでは横着してbrew install rustとしたけど、それだといろいろ無いっぽいので、toolchain一式入るように入れ直す。

まずはお掃除

% brew uninstall rust

無いことを確認。

% which rustc
% which cargo

公式ドキュメントに従ってインストール

www.rust-lang.org

% curl https://sh.rustup.rs -sSf | sh

以下、その出力全文

info: downloading installer

Welcome to Rust!

This will download and install the official compiler for the Rust programming
language, and its package manager, Cargo.

It will add the cargo, rustc, rustup and other commands to Cargo's bin
directory, located at:

  /Users/otiai10/.cargo/bin

This path will then be added to your PATH environment variable by modifying the
profile files located at:

  /Users/otiai10/.profile
  /Users/otiai10/.zprofile

You can uninstall at any time with rustup self uninstall and these changes will
be reverted.

Current installation options:

   default host triple: x86_64-apple-darwin
     default toolchain: stable
  modify PATH variable: yes

1) Proceed with installation (default)
2) Customize installation
3) Cancel installation
1

info: syncing channel updates for 'stable-x86_64-apple-darwin'
info: latest update on 2018-02-15, rust version 1.24.0 (4d90ac38c 2018-02-12)
info: downloading component 'rustc'
 38.5 MiB /  38.5 MiB (100 %)  27.1 MiB/s ETA:   0 s
info: downloading component 'rust-std'
 54.6 MiB /  54.6 MiB (100 %)  29.1 MiB/s ETA:   0 s
info: downloading component 'cargo'
info: downloading component 'rust-docs'
info: installing component 'rustc'
info: installing component 'rust-std'
info: installing component 'cargo'
info: installing component 'rust-docs'
info: default toolchain set to 'stable'

  stable installed - rustc 1.24.0 (4d90ac38c 2018-02-12)


Rust is installed now. Great!

To get started you need Cargo's bin directory ($HOME/.cargo/bin) in your PATH
environment variable. Next time you log in this will be done automatically.

To configure your current shell run source $HOME/.cargo/env

ということで、言われたとおり、$HOME/.cargo/binPATHに追加する。

% ls $HOME/.cargo/bin
cargo     cargo-fmt rls       rust-gdb  rust-lldb rustc     rustdoc   rustfmt   rustup
% echo 'export PATH=${HOME}/.cargo/bin:${PATH}' >> ~/.zshrc
% source ~/.zshrc
% which rustc
/Users/otiai10/.cargo/bin/rustc
% rustc --version
rustc 1.24.0 (4d90ac38c 2018-02-12)

いいですね。

cargo new してみる

% cd ~/proj/rust
% cargo new --help
% cargo new --bin
% cd hello
% cargo run
   Compiling hello v0.1.0 (file:///Users/otiai10/proj/rust/hello)
    Finished dev [unoptimized + debuginfo] target(s) in 0.39 secs
     Running `target/debug/hello`
Hello, world!
%

いい感じに、前回記事の状態を再現できた。

DRY


以下追記 2018/02/27

error: toolchain 'beta-x86_64-apple-darwin' does not have the binary rustfmt

rustfmtが動かんかったので

% rustfmt --version
error: toolchain 'beta-x86_64-apple-darwin' does not have the binary `rustfmt`
% rustup update
# ↓ toolchain install は要りません。
# rustup toolchain install stable-x86_64-apple-darwin
% rustup component add rustfmt-preview
% rustfmt --version
0.3.8-nightly (346238f 2018-02-04)

はい。

【Go言語】複数並列goroutineの中でのSIGINTの捕捉

やりたいこと

  • 複数立ち上がっているgoroutineの中で、それぞれ独立にSIGINT捕捉できるだろうか?という素朴な疑問

ソースコード

  • 期待されるアウトプット「各goroutineのidとinterruptedというログが出る」
package main

import (
    "fmt"
    "os"
    "os/signal"
    "sync"
)

func main() {
    wg := new(sync.WaitGroup)
    for i := 0; i < 10; i++ {
        wg.Add(1)
        go spawn(i, wg)
    }
    wg.Wait()
    fmt.Println("hoge")
}

func spawn(id int, wg *sync.WaitGroup) {
    c := make(chan os.Signal, 1)
    defer close(c)
    signal.Notify(c, os.Interrupt)
    sig := <-c
    // ↑ここでwg.Doneをblockしているので、
    // Ctrl+cを押さないとDoneに至らず、
    // この親プロセスは終わらないです。
    fmt.Println(id, sig)
    wg.Done()
}

実行結果

% go run main.go
^C3 interrupt
1 interrupt
2 interrupt
5 interrupt
7 interrupt
0 interrupt
9 interrupt
8 interrupt
4 interrupt
6 interrupt
hoge
%
  • 理解した

雑感

  • ねむい

DRYな備忘録として